How to Check Your Email IP Blacklist Status in 2026
One blacklisted IP can silently kill your cold outreach. Here's how to check email IP blacklist status, read the results, and get delisted fast.
Your open rates didn't drop because your subject lines got worse. They dropped because a chunk of your email never reached the inbox at all — it got filtered, bounced, or silently dumped into spam by receiving servers that saw your sending IP sitting on a blacklist. If you have never checked, you are flying blind.
This guide shows you exactly how to check email IP blacklist status, how to read the alphabet soup of DNSBLs that mailbox providers actually trust, and what to do the moment you find your IP listed. No fluff, no "synergize your outreach" filler. Just the workflow.
TL;DR#
- A DNS-based blacklist (DNSBL/RBL) is a real-time list of IPs and domains flagged for spam; Gmail, Outlook, and corporate filters query them before accepting your mail.
- To check email IP blacklist status, run your sending IP through a multi-list lookup (MXToolbox, Spamhaus, or a free blacklist checker) and review every "listed" result, not just the first.
- The lists that matter most are Spamhaus (SBL/XBL/PBL), Barracuda, SpamCop, and SORBS — a hit on Spamhaus is the one that actually torches deliverability.
- Most listings come from dirty lists, no warmup, missing SPF/DKIM/DMARC, or a shared IP poisoned by other senders — fix the cause before you request delisting.
- Prevent repeat listings by verifying every address before you send, warming the IP, and authenticating your domain.
What is an email IP blacklist?#
An email IP blacklist is a public database of IP addresses (and sometimes domains) that have been associated with spam, malware, or abusive sending. Think of it like a credit blacklist for your mail server: when you try to "borrow" inbox access from Gmail, Gmail checks whether your IP has a bad reputation before it lets your message through.
These lists are technically called DNSBLs (DNS-based blocklists) or RBLs (real-time blackhole lists). When a receiving mail server gets a connection from your IP, it fires a near-instant DNS query against dozens of these lists. If your IP comes back "listed," the server can reject the message outright, throttle you, or quietly route you to spam. You usually get no warning — that is the cruel part. Your campaign just underperforms.
This is different from domain reputation, though the two interact. A clean domain on a filthy IP still suffers, which is why you check both. If you want the deeper definitions, Tomba's glossary entries on email deliverability and sender reputation are a useful primer.

The lists that actually move the needle#
There are hundreds of blacklists, but mailbox providers don't weight them equally. Here is the short list worth memorizing:
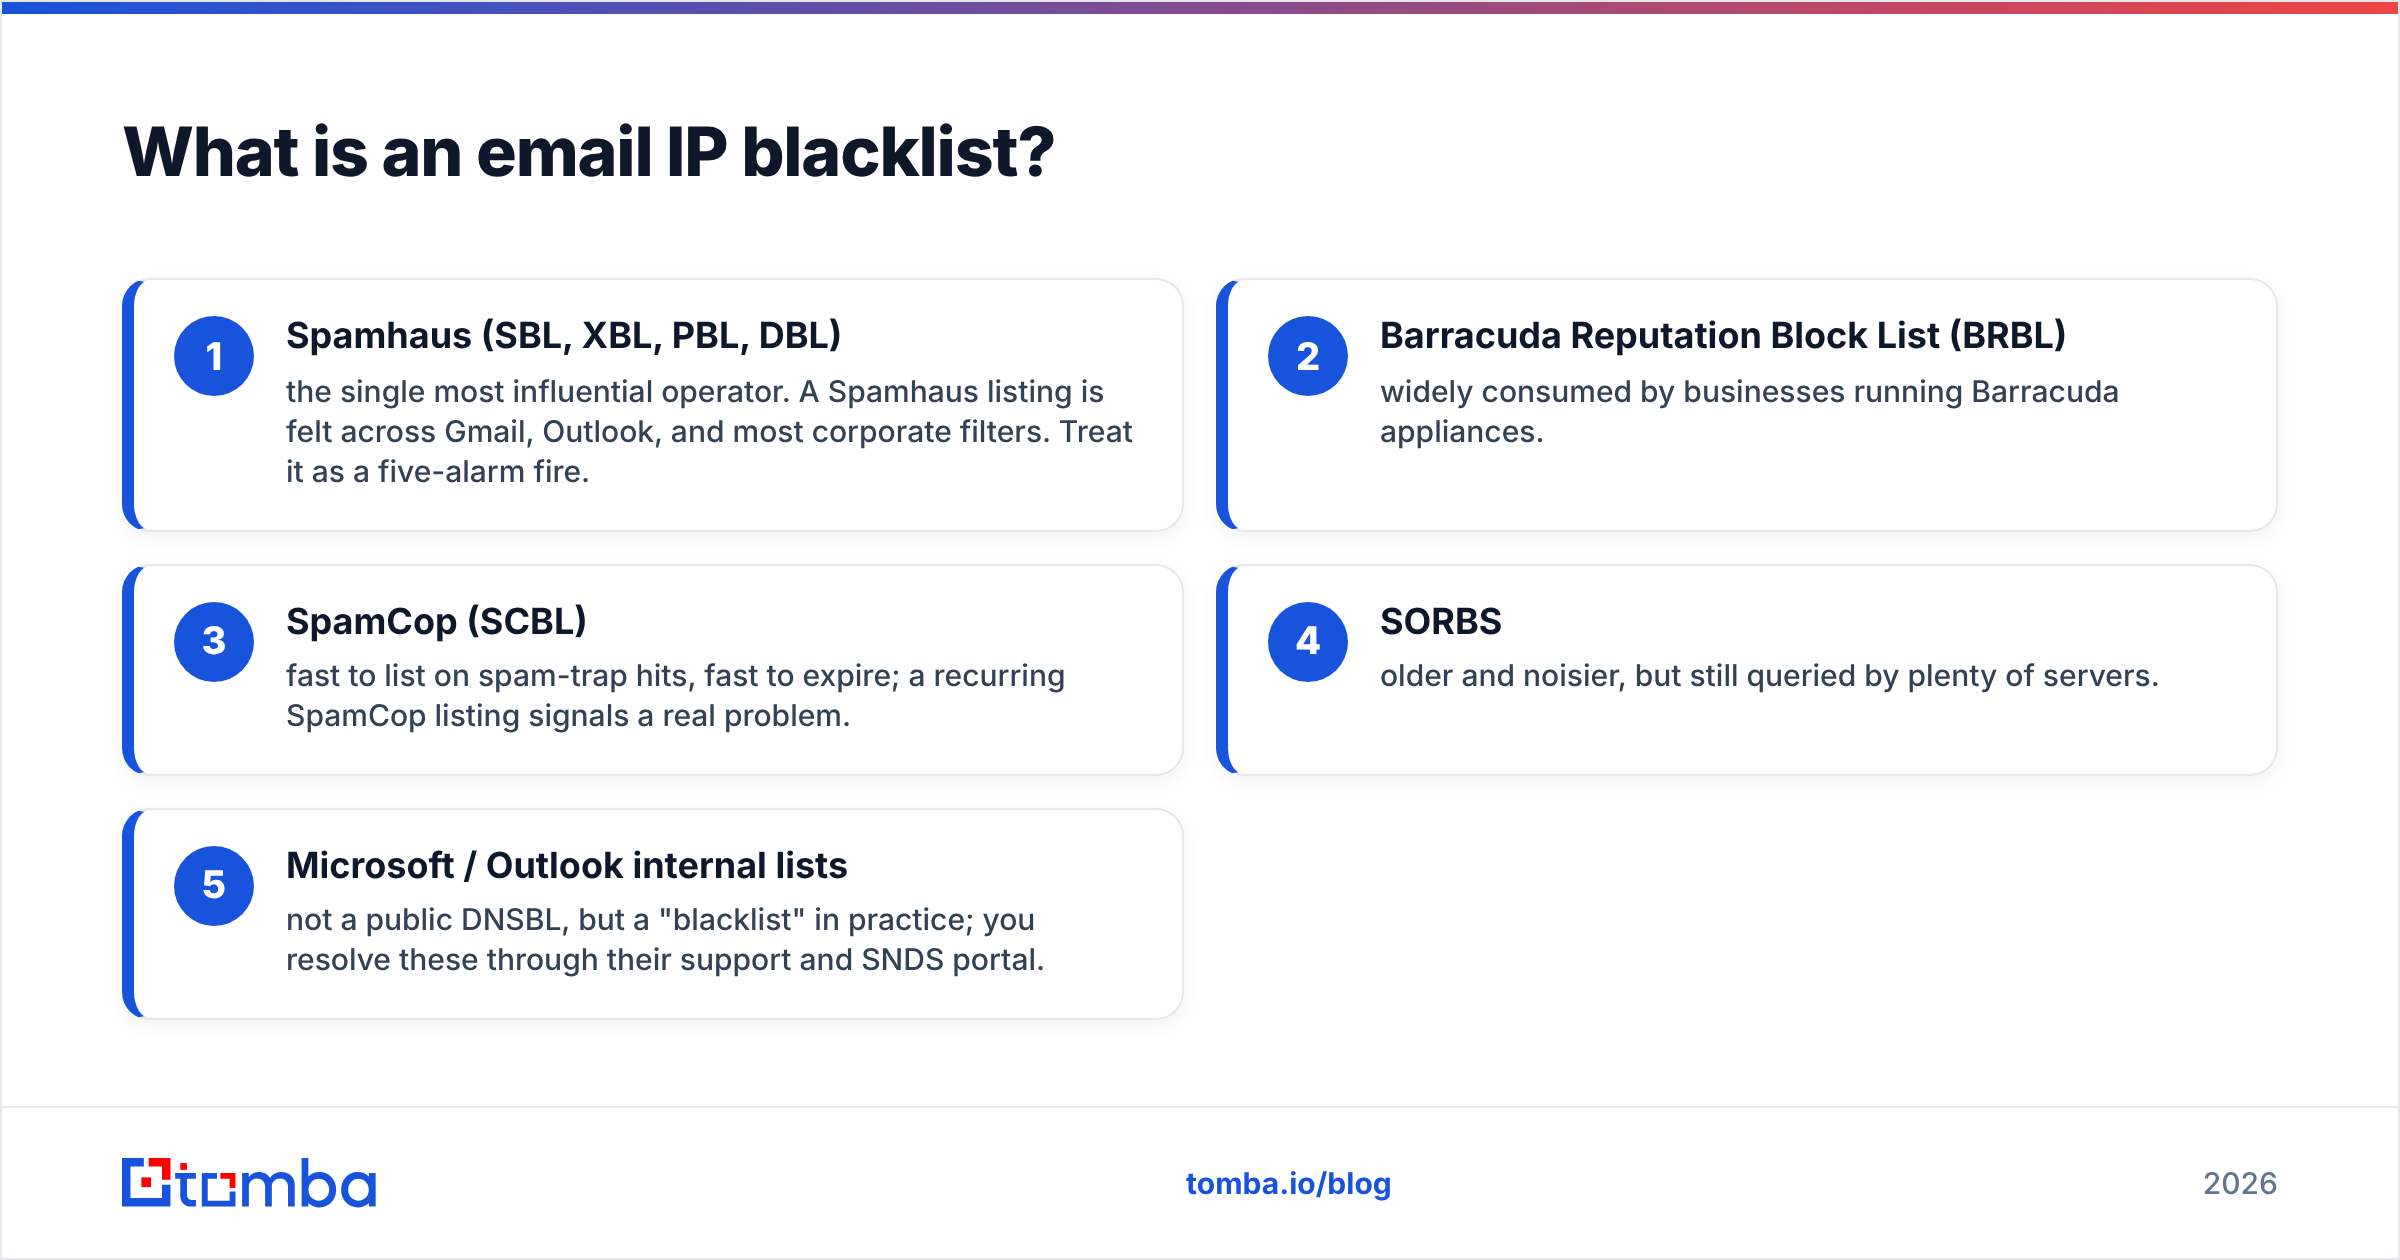
- Spamhaus (SBL, XBL, PBL, DBL) — the single most influential operator. A Spamhaus listing is felt across Gmail, Outlook, and most corporate filters. Treat it as a five-alarm fire.
- Barracuda Reputation Block List (BRBL) — widely consumed by businesses running Barracuda appliances.
- SpamCop (SCBL) — fast to list on spam-trap hits, fast to expire; a recurring SpamCop listing signals a real problem.
- SORBS — older and noisier, but still queried by plenty of servers.
- Microsoft / Outlook internal lists — not a public DNSBL, but a "blacklist" in practice; you resolve these through their support and SNDS portal.
A hit on a tiny, obscure list rarely hurts. A hit on Spamhaus or Barracuda hurts immediately.
How do you check email IP blacklist status?#
Conclusion first: run your sending IP through a multi-list checker, then confirm any hit on the source list's own lookup page. Here is the step-by-step.
Step 1 — Find your actual sending IP. This is the IP your mail leaves from, not your office Wi-Fi address. If you use Google Workspace, Microsoft 365, SendGrid, Amazon SES, or a cold-email platform, the sending IP is theirs (often a shared pool). Check the Received: headers of a test email you sent to yourself, or your ESP's dashboard. For a self-hosted server, it is your server's public IP.
Step 2 — Run a multi-blacklist lookup. Paste the IP into a tool that queries many DNSBLs at once. The fastest free path is MXToolbox Blacklist Check, which scans 80+ lists in one pass. Tomba's own blacklist checker does the same inside your sales stack so you are not bouncing between tabs.
Step 3 — Check Spamhaus directly. Because Spamhaus is the heavyweight, confirm there separately at Spamhaus IP & Domain Reputation Checker. It tells you which specific list (SBL vs XBL vs PBL) caught you, which changes how you fix it.
Step 4 — Read every result, not just the top one. A common mistake is seeing one green "OK" and relaxing. Scroll the full report. One red listing on Spamhaus outweighs fifty greens.
Step 5 — Check your domain too. IP and domain reputation are separate. Run your root domain against domain-level lists (Spamhaus DBL, SURBL). A poisoned domain follows you even if you switch IPs.
Reading the results without panicking#
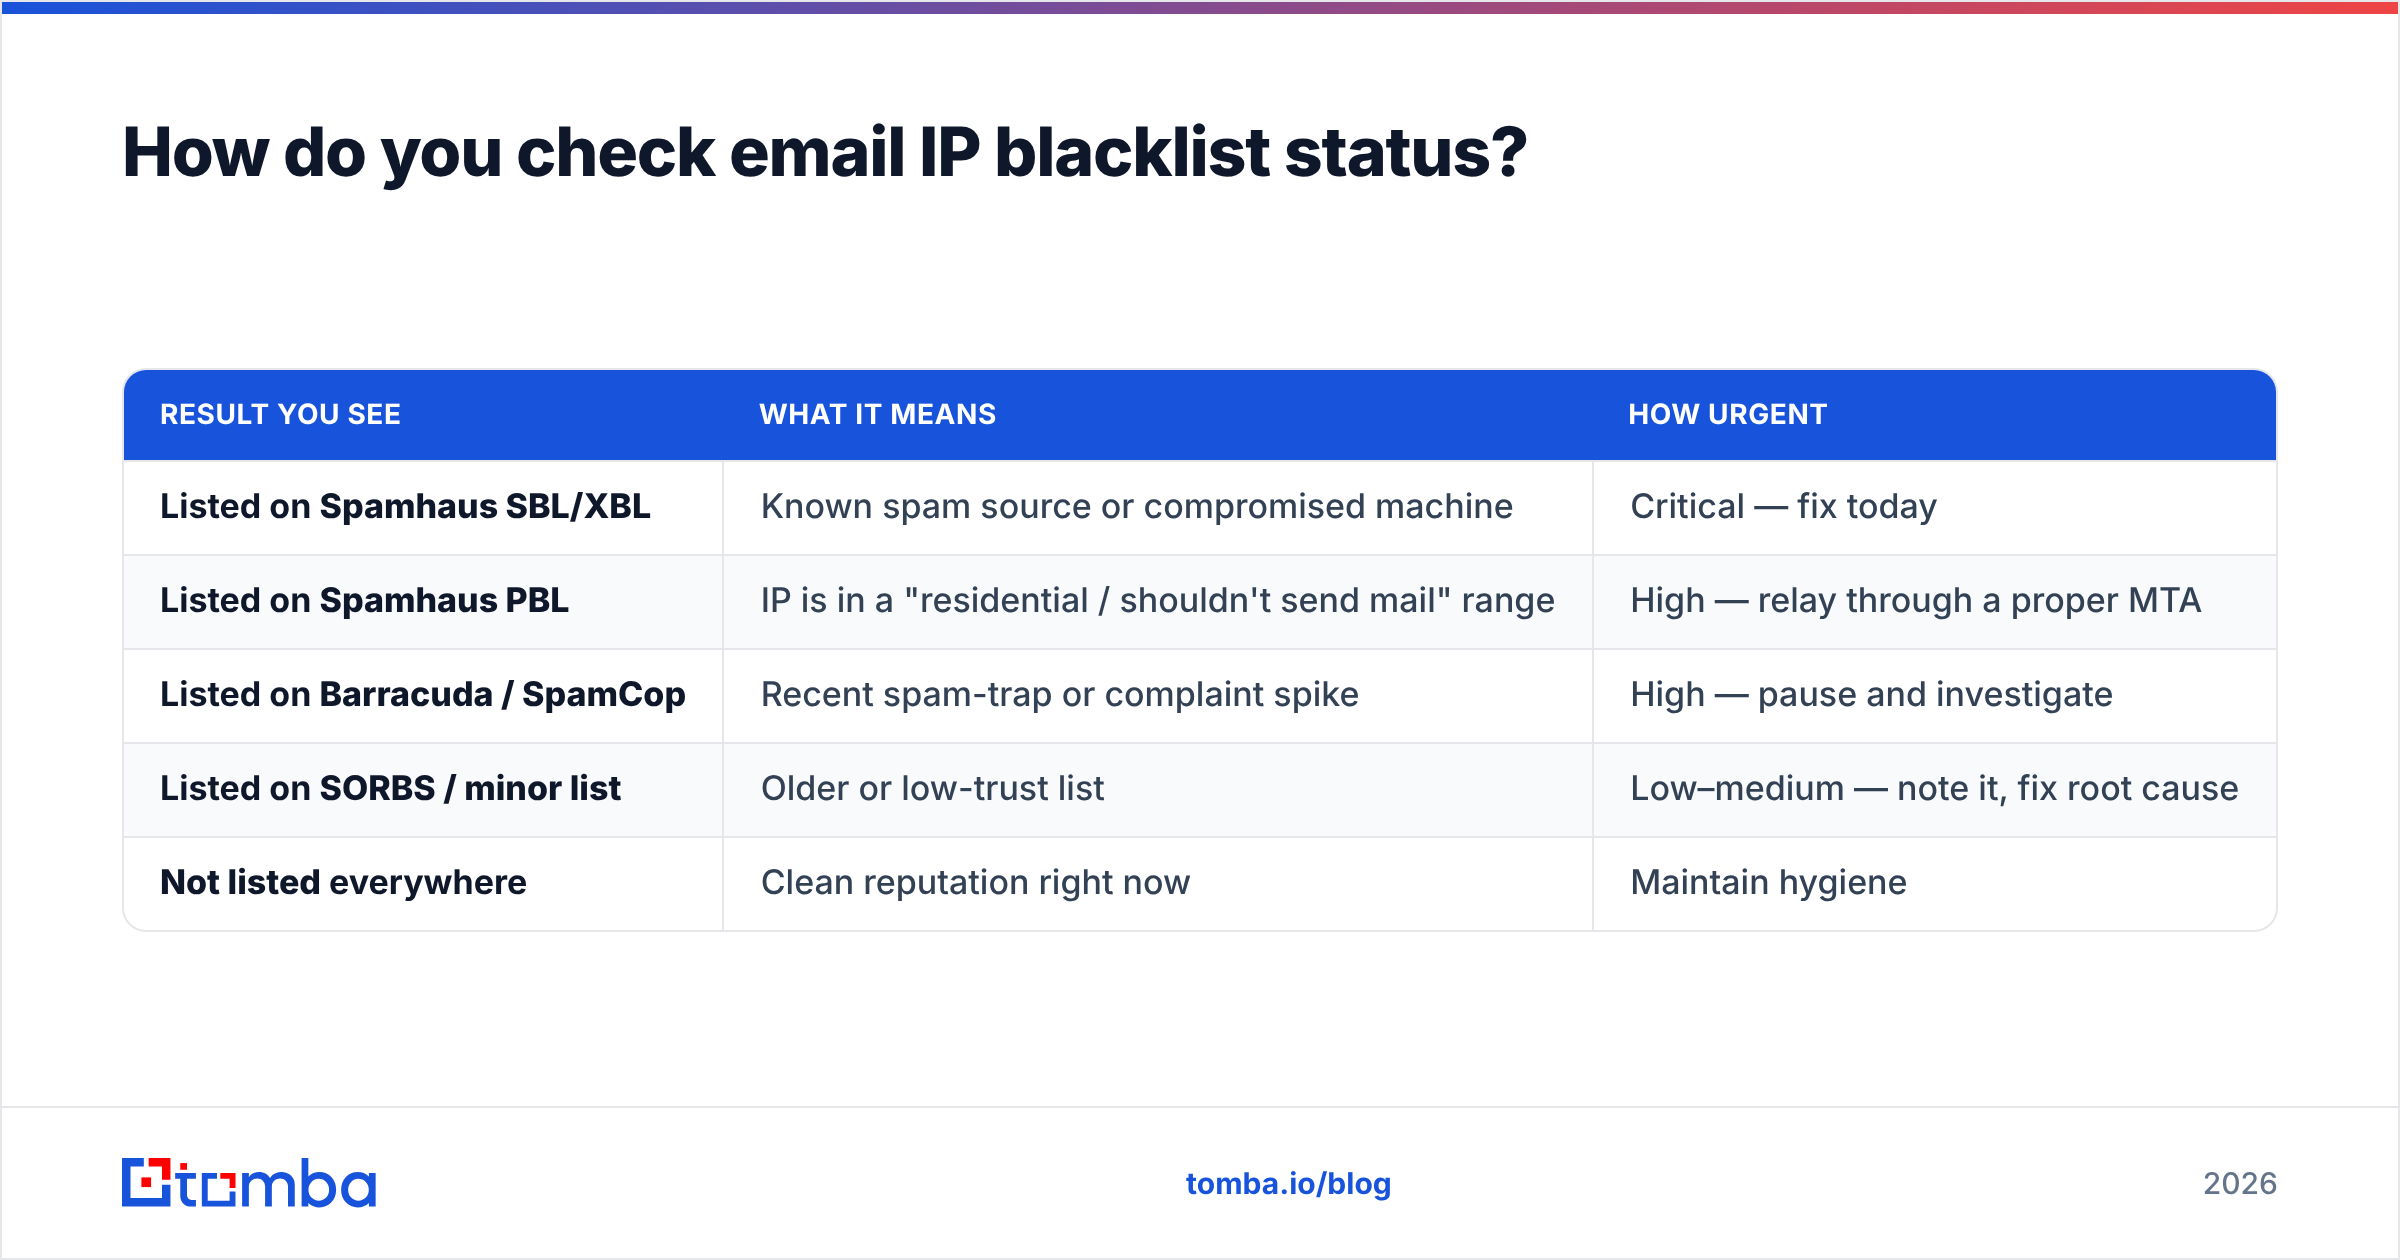
| Result you see | What it means | How urgent |
|---|---|---|
| Listed on Spamhaus SBL/XBL | Known spam source or compromised machine | Critical — fix today |
| Listed on Spamhaus PBL | IP is in a "residential / shouldn't send mail" range | High — relay through a proper MTA |
| Listed on Barracuda / SpamCop | Recent spam-trap or complaint spike | High — pause and investigate |
| Listed on SORBS / minor list | Older or low-trust list | Low–medium — note it, fix root cause |
| Not listed everywhere | Clean reputation right now | Maintain hygiene |
If you are on a shared IP (most Google Workspace and ESP users are), a single listing may be caused by another tenant, not you. You still feel the pain, but the fix is different — you lean on your provider or move to a dedicated IP.
Why did your IP get blacklisted?#
You can't fix what you don't diagnose. Blacklistings almost always trace back to one of these causes, roughly in order of frequency:
- You emailed a dirty list. Sending to invalid addresses and spam traps is the fastest route to a listing. A spam trap is an address that exists only to catch senders who didn't verify their list. Hit a few and Spamhaus notices.
- You skipped IP warmup. Going from zero to 2,000 emails a day on a fresh IP looks exactly like a spammer's pattern. Providers throttle, then lists flag.
- Missing or broken authentication. No SPF, DKIM, or DMARC tells receivers you can't prove who you are. Set up your SPF record and run an SPF checker before you scale.
- Complaint spikes. Too many recipients hitting "report spam" pushes you onto complaint-driven lists like SpamCop fast.
- A poisoned shared IP. On shared pools, another sender's bad behavior can list the whole IP. This is the strongest argument for dedicated infrastructure once volume justifies it.
- A compromised account or open relay. If malware or a hijacked SMTP login is blasting mail through your server, you land on XBL. Secure it before delisting, or you'll be relisted in hours.

Notice the pattern: nearly every cause is preventable with list hygiene and authentication. Delisting without fixing the cause is like bailing water without plugging the hole — you'll be back on the list within a week, and repeat offenders get listed faster each time.
How do you get removed from a blacklist?#
Delisting is straightforward once the underlying problem is solved. The order matters: fix first, request removal second.
- Stop sending from the listed IP. Pause campaigns so you stop generating new complaints or trap hits while you work.
- Identify and fix the root cause. Clean the list, fix authentication, secure the account, or correct your warmup ramp. Use the diagnosis table above to map the listing to its cause.
- Find the delisting form. Most major lists let you self-remove. Spamhaus, Barracuda, and SpamCop each have a removal page where you enter the IP. Minor lists often auto-expire in 24–48 hours if you stop the bad behavior.
- Submit the request honestly. Don't request delisting five times in an hour — that flags you. Submit once, explain what you fixed if there's a field for it, and wait.
- Re-check after the stated window. Run the blacklist lookup again to confirm removal before you resume sending.
- Warm back up slowly. A previously listed IP has bruised reputation. Ramp volume gradually rather than spiking again.
Some listings — especially Microsoft's internal ones — require opening a support ticket and enrolling in their Smart Network Data Services. There is no instant button; expect a few days.
How do you prevent blacklisting in the first place?#
The best blacklist response is never landing on one. Three habits cover 90% of the risk.
Verify before you send. This is the highest-leverage move. If you remove invalid addresses, role accounts, and spam traps before a campaign, you starve the lists of the signal they punish. Run your list through an email verifier so every address is checked for syntax, MX records, and deliverability first. Verifying is cheaper than the revenue you lose during a Spamhaus listing.
Authenticate your domain. SPF, DKIM, and DMARC together prove you are who you claim to be. Google and Yahoo now effectively require them for bulk senders. This is non-negotiable in 2026.
Warm up and monitor. Ramp new IPs over 2–4 weeks, keep complaint rates under 0.1%, and check your reputation on a schedule instead of after the damage. Google's own Postmaster Tools shows your domain and IP reputation directly from the source.
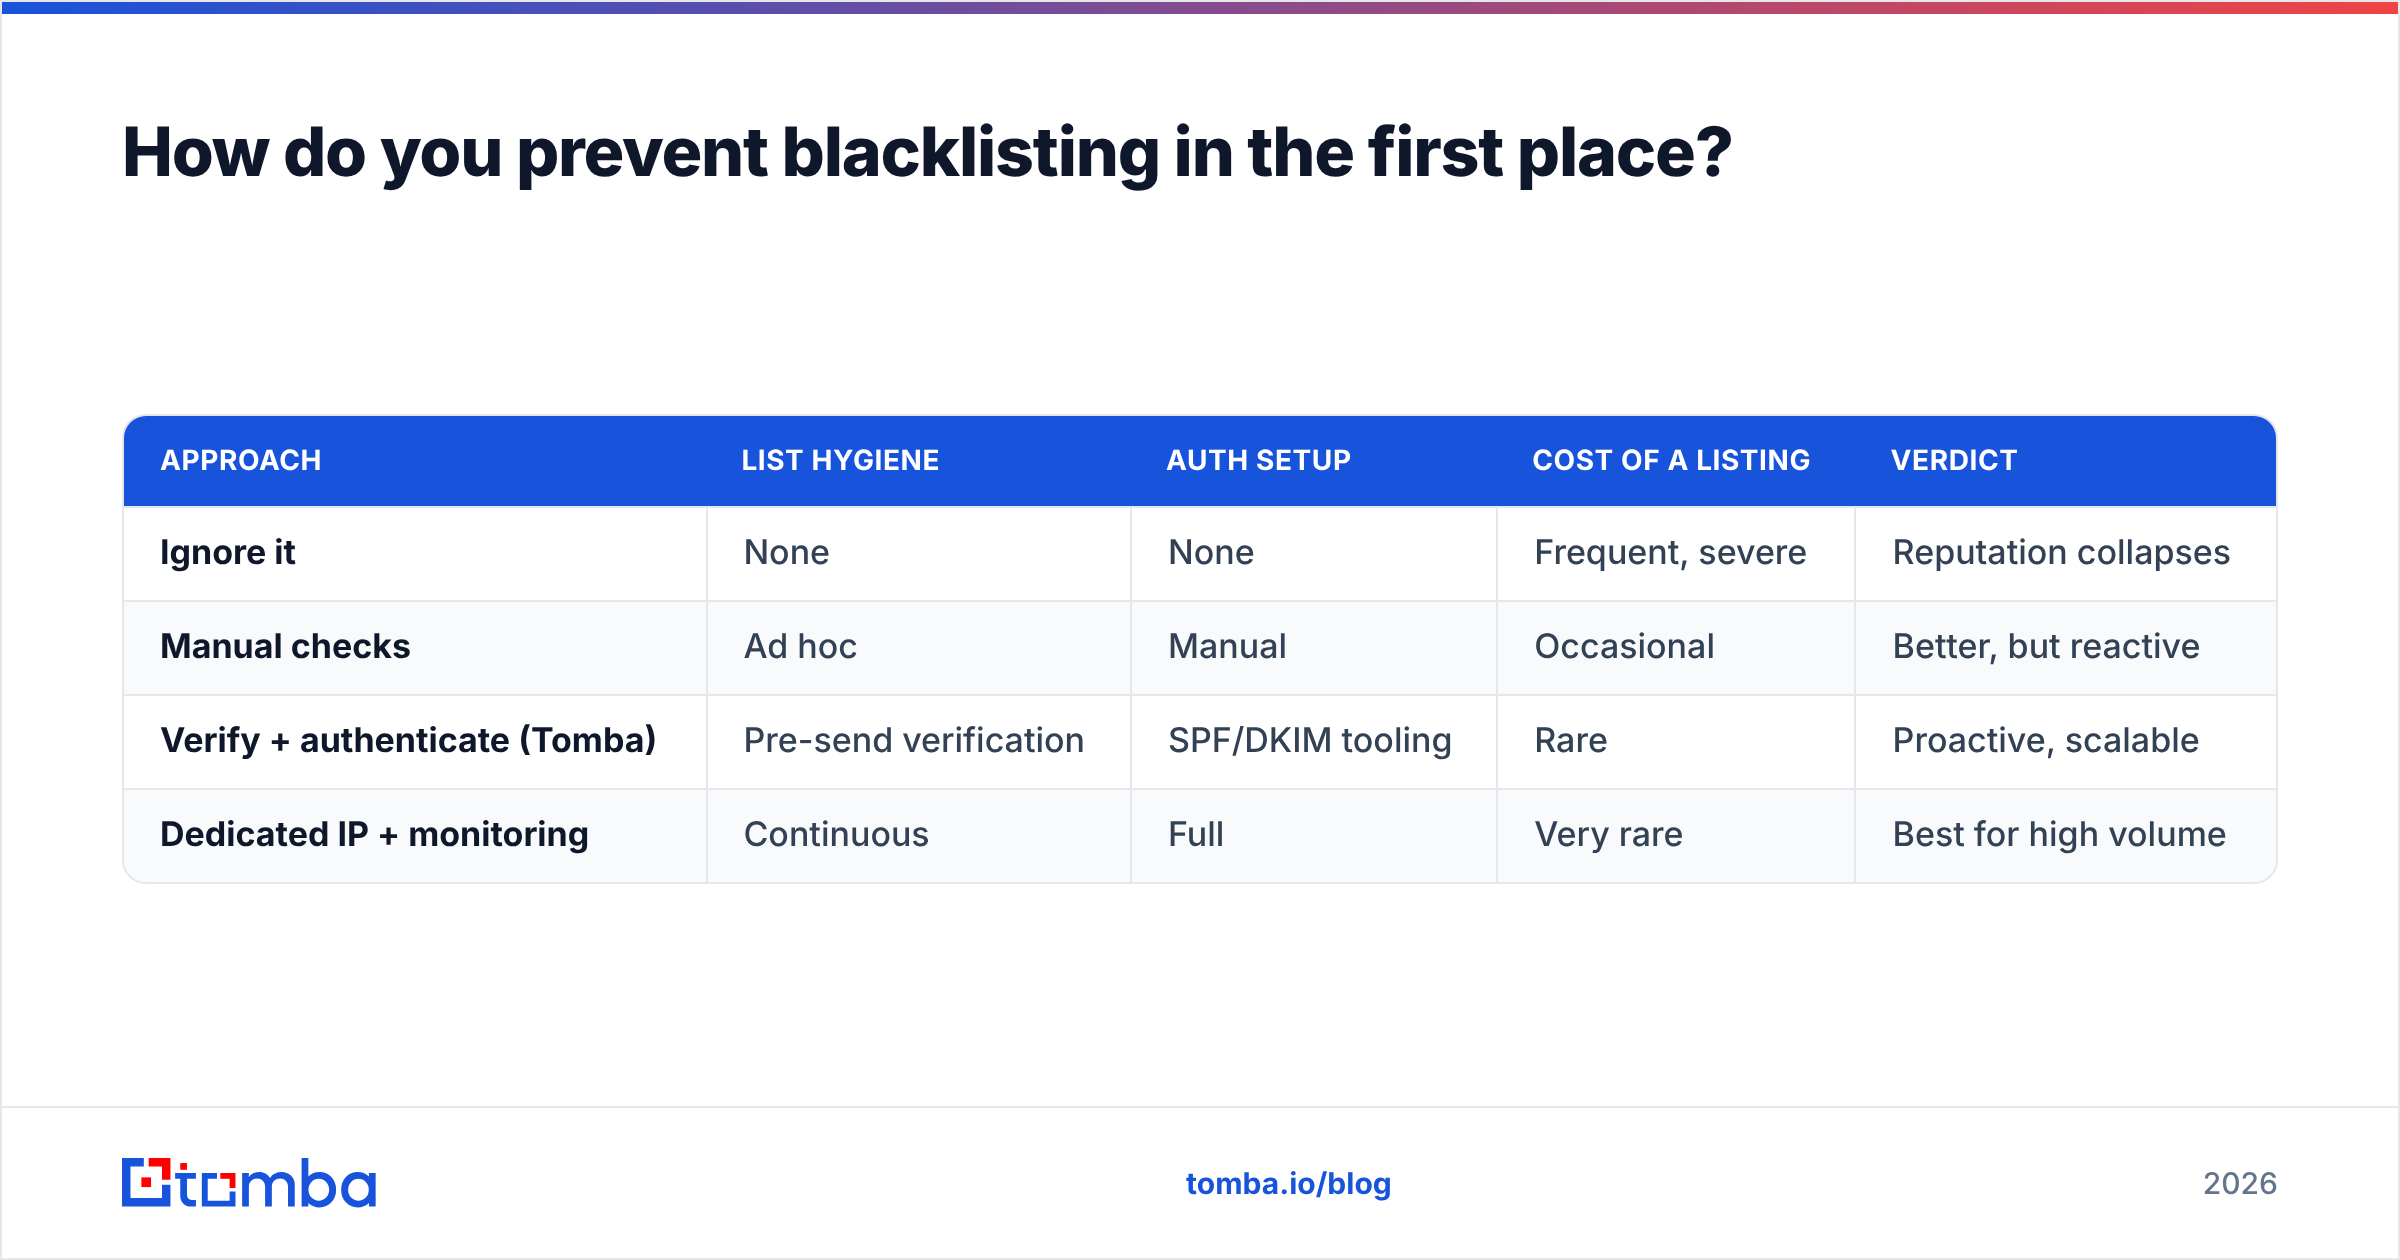
Here is how the prevention tooling stacks up against doing it manually or ignoring it:
| Approach | List hygiene | Auth setup | Cost of a listing | Verdict |
|---|---|---|---|---|
| Ignore it | None | None | Frequent, severe | Reputation collapses |
| Manual checks | Ad hoc | Manual | Occasional | Better, but reactive |
| Verify + authenticate (Tomba) | Pre-send verification | SPF/DKIM tooling | Rare | Proactive, scalable |
| Dedicated IP + monitoring | Continuous | Full | Very rare | Best for high volume |
If you send at any real volume, the verify-and-authenticate row is the floor, not the ceiling.
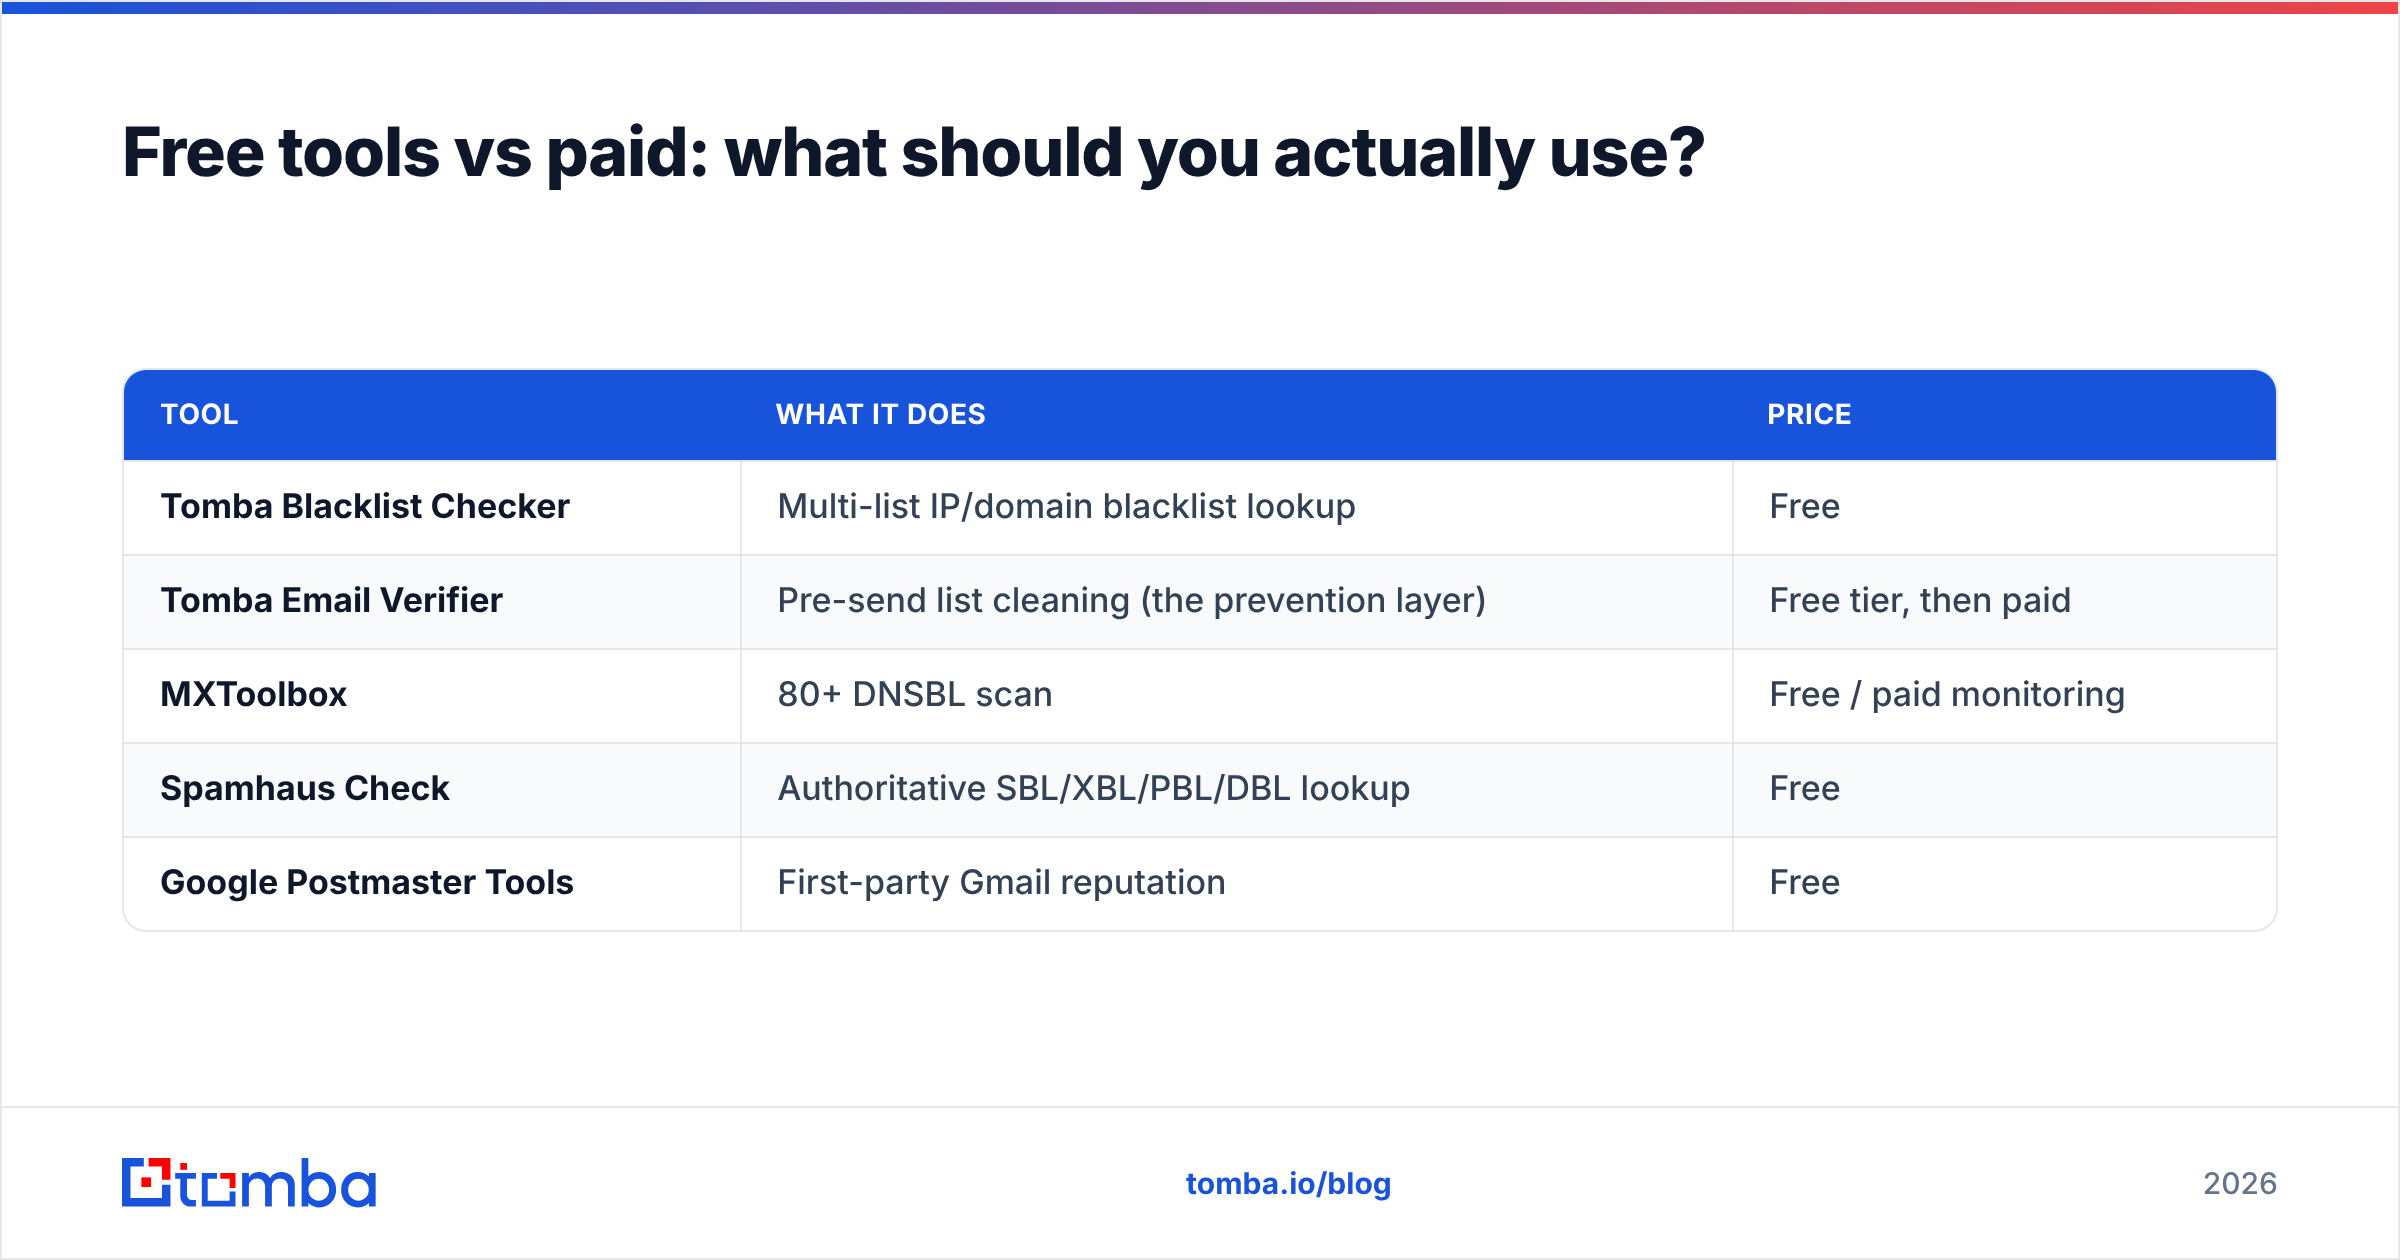
Free tools vs paid: what should you actually use?#
You don't need an enterprise contract to check email IP blacklist status. A practical stack looks like this:
| Tool | What it does | Price |
|---|---|---|
| Tomba Blacklist Checker | Multi-list IP/domain blacklist lookup | Free |
| Tomba Email Verifier | Pre-send list cleaning (the prevention layer) | Free tier, then paid |
| MXToolbox | 80+ DNSBL scan | Free / paid monitoring |
| Spamhaus Check | Authoritative SBL/XBL/PBL/DBL lookup | Free |
| Google Postmaster Tools | First-party Gmail reputation | Free |
For ongoing programs, pair a free lookup for spot checks with continuous verification so your list never degrades to the point of getting listed. Tomba's broader plans — see Tomba pricing — bundle verification, data enrichment, and finding into one stack so your reputation work lives next to your prospecting work instead of in five disconnected tabs.
Frequently asked questions#
How often should I check my sending IP? Weekly for active senders, and immediately after any deliverability dip. Set a calendar reminder; reputation problems are cheapest to fix early.
Does one blacklist hit ruin everything? No — a hit on a minor list barely registers. A hit on Spamhaus or Barracuda, however, can suppress a large share of your inbox placement until resolved.
Can I just switch IPs to escape a listing? Sometimes, but if your domain or your list hygiene caused it, the new IP gets listed too. Fix the cause first.
Is a shared IP risky? It carries the actions of every other tenant. Fine at low volume; worth upgrading to a dedicated IP as you scale and want full control of reputation.
How long does delisting take? Minor lists often clear in 24–48 hours automatically. Spamhaus and Microsoft can take longer and may require a ticket. Don't spam the removal form — it backfires.
Keep your IP clean before you ever check it#
Checking a blacklist tells you the damage is done. The smarter play is to never give the lists a reason to flag you — and that starts with sending only to addresses you've confirmed are real. Run every list through the Tomba Email Verifier before your next campaign: it strips invalids, role accounts, and spam traps so the signals that trigger Spamhaus never reach it. Combine that with proper SPF/DKIM, a sane warmup, and a weekly blacklist check, and "is my IP blacklisted?" stops being a question that costs you pipeline. Start free, verify your list, and protect the only sending reputation you've got.
// get started
Find, verify and enrich your first contacts today
Start on the free plan with 25 searches a month, then scale when your team is ready.
Free plan · No credit card required · GDPR & CCPA
// about the author