DKIM for Office 365: The Complete 2026 Setup Guide
Microsoft 365 signs your outbound mail with a shared onmicrosoft.com key by default — which does nothing for your domain reputation. Here's how to publish, enable, and verify custom DKIM properly.
TL;DR
- Microsoft 365 signs every outbound message by default — but with the shared
yourtenant.onmicrosoft.comkey, which builds Microsoft's reputation, not yours. DMARC will not align on it. - Real DKIM for Office 365 means publishing two CNAME records (
selector1._domainkeyandselector2._domainkey) that point at Microsoft-hosted keys, then flipping the domain to "Enabled" in Defender. - Microsoft rotates between selector1 and selector2 automatically. That's why there are two records, and why deleting one silently breaks signing weeks later.
- New tenants default to 2048-bit keys; older domains may still be on 1024-bit and need a manual rotation.
- DKIM alone doesn't stop spoofing. You need SPF + DKIM + DMARC, and clean recipient data, before your cold outbound gets consistent inbox placement.
What is DKIM and why does Office 365 handle it differently?#
DKIM (DomainKeys Identified Mail) is a signature stamped into the header of every outbound message. Think of it like a wax seal on a letter: the sending server presses a private key into the envelope, and the receiving server looks up the matching public key in DNS to confirm nobody tampered with it in transit.
Most email platforms hand you a TXT record containing the public key itself. Microsoft doesn't. Exchange Online keeps the private and public key material on Microsoft's side and asks you to publish two CNAME records that point into dkim.mail.microsoft-hosted zones. That single design decision explains almost every DKIM problem admins hit in Office 365:
- You can't paste a TXT key. If your DNS provider's UI only offers TXT for
_domainkeyrecords, you're using the wrong record type and validation will fail. - You need two records, not one. Microsoft rotates signing keys between
selector1andselector2on its own schedule. Only publishing one works — until the rotation happens. - Enabling comes second. Publishing DNS does nothing until you toggle the domain to Enabled in the Defender portal or via PowerShell.
- CNAME targets are tenant-specific. They embed your initial
onmicrosoft.comdomain name. Copying another org's records is a guaranteed failure.
What happens if you leave the default Microsoft DKIM in place?#
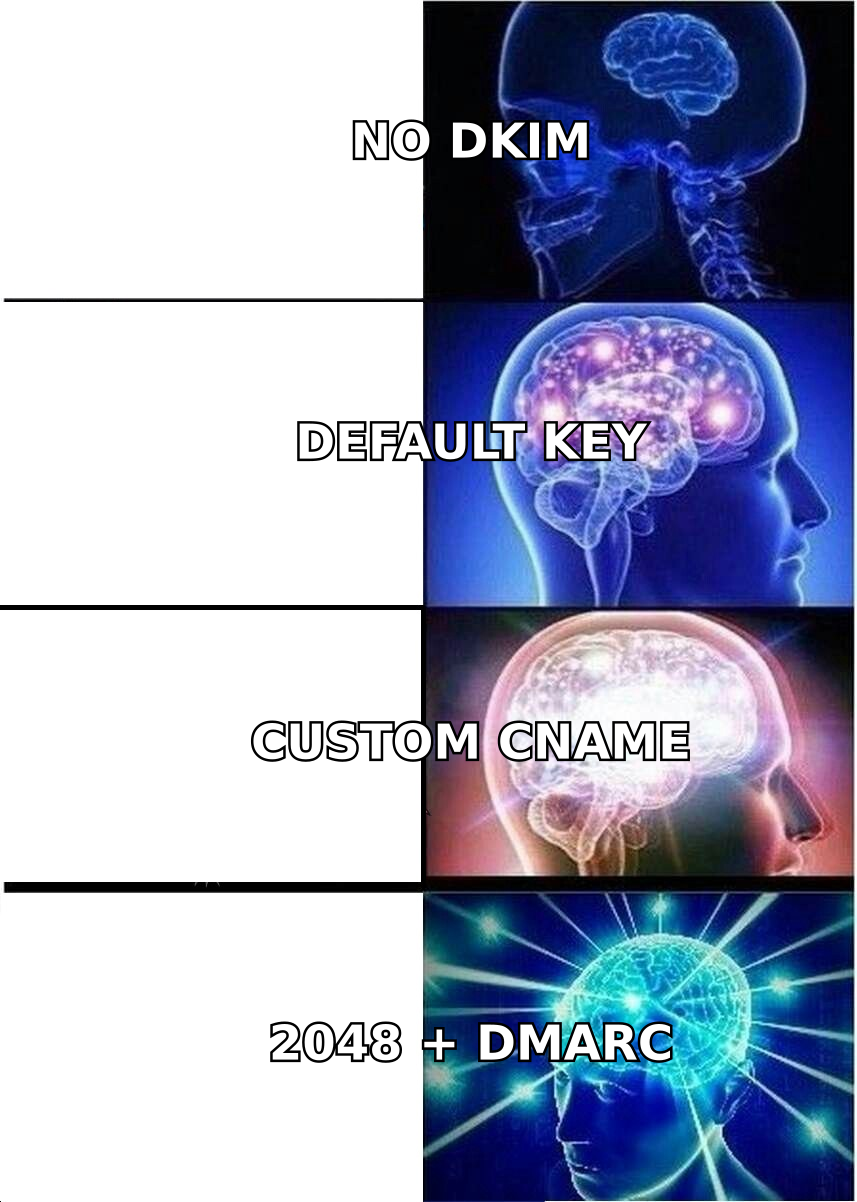
Your mail still gets signed — with d=yourtenant.onmicrosoft.com. Headers will show dkim=pass, which fools a lot of admins into thinking the job is done.
It isn't. DMARC evaluates alignment, not just pass/fail. Alignment means the domain in the DKIM signature (d=) has to match the domain in the visible From address. If you send as sales@yourcompany.com but sign as yourtenant.onmicrosoft.com, DKIM alignment fails. Your DMARC record then leans entirely on SPF alignment, and the moment mail is forwarded — SPF breaks on forwarding by design — you have zero passing authentication mechanisms.
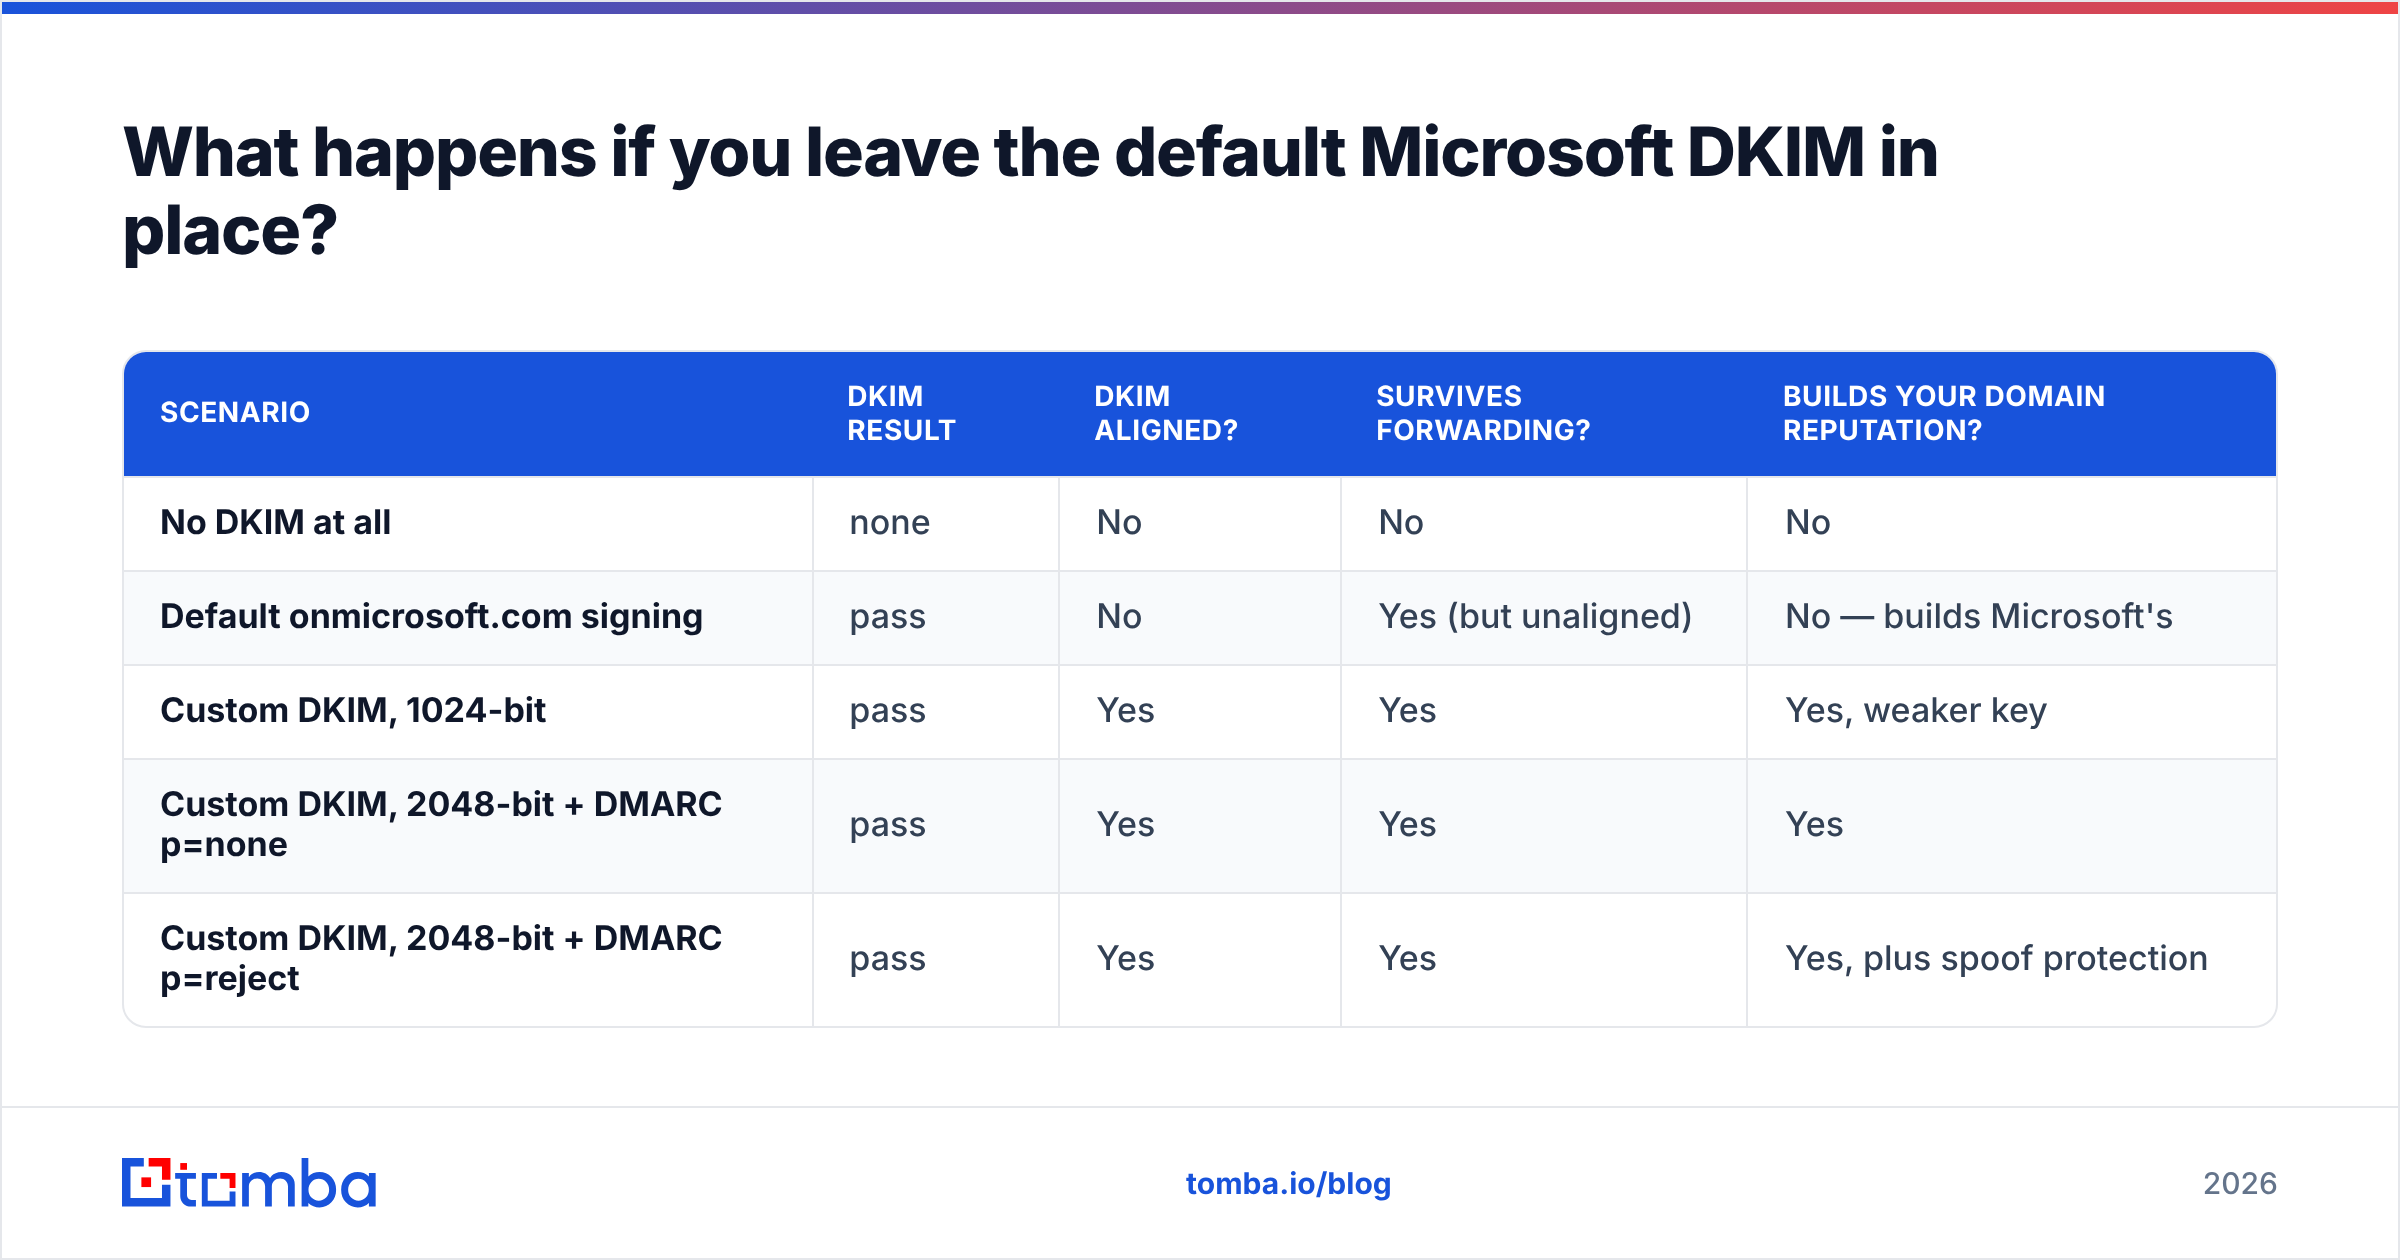
| Scenario | DKIM result | DKIM aligned? | Survives forwarding? | Builds your domain reputation? |
|---|---|---|---|---|
| No DKIM at all | none | No | No | No |
| Default onmicrosoft.com signing | pass | No | Yes (but unaligned) | No — builds Microsoft's |
| Custom DKIM, 1024-bit | pass | Yes | Yes | Yes, weaker key |
| Custom DKIM, 2048-bit + DMARC p=none | pass | Yes | Yes | Yes |
| Custom DKIM, 2048-bit + DMARC p=reject | pass | Yes | Yes | Yes, plus spoof protection |
Google and Yahoo's bulk-sender requirements, in force since 2024, made this concrete: senders pushing meaningful volume to consumer inboxes need SPF and DKIM, a DMARC record, and one-click unsubscribe. Unaligned onmicrosoft.com signing doesn't clear that bar for your own domain.
How do you set up custom DKIM in Office 365 step by step?#
Budget about ten minutes of work plus DNS propagation time.
Step 1 — Find your CNAME values. Go to the Microsoft Defender portal at security.microsoft.com → Email & collaboration → Policies & rules → Threat policies → Email authentication settings → DKIM. Select your custom domain. If DKIM was never configured, Microsoft shows the two CNAME records you need to publish.
If the portal won't show them, you can construct them yourself. The pattern is fixed:
- Host:
selector1._domainkey→ Points to:selector1-yourdomain-com._domainkey.yourtenant.onmicrosoft.com - Host:
selector2._domainkey→ Points to:selector2-yourdomain-com._domainkey.yourtenant.onmicrosoft.com
Note the substitution rule: in the target value, dots in your domain become hyphens (acme.com → acme-com), and yourtenant is the prefix of your initial Microsoft domain — the one that ends in .onmicrosoft.com. Get that prefix from Microsoft 365 admin center → Settings → Domains.
Step 2 — Publish both CNAMEs at your DNS host. Record type must be CNAME. TTL of 3600 is fine. Do not add a trailing dot unless your provider requires it, and do not append your domain to the host field if your provider already does that automatically — a doubled selector1._domainkey.acme.com.acme.com is the single most common misconfiguration.
Step 3 — Wait for propagation. Usually minutes, occasionally a few hours. Verify from a terminal:
dig CNAME selector1._domainkey.yourdomain.com +short
dig CNAME selector2._domainkey.yourdomain.com +short
Both should return the Microsoft targets. On Windows: nslookup -type=cname selector1._domainkey.yourdomain.com.
Step 4 — Enable signing. Back in the Defender DKIM page, toggle the domain to Enabled. Or use Exchange Online PowerShell:
Connect-ExchangeOnline
New-DkimSigningConfig -DomainName yourdomain.com -KeySize 2048 -Enabled $true
Get-DkimSigningConfig -Identity yourdomain.com | Format-List Selector1CNAME,Selector2CNAME,Enabled,KeySize
If the toggle throws "No DKIM keys saved for this domain," run New-DkimSigningConfig first — the portal sometimes can't create the key material on its own for domains added long ago.
Step 5 — Verify a real message. Send to an external address you control, open the raw headers, and look for Authentication-Results. You want dkim=pass header.d=yourdomain.com — the header.d value is the part that matters. If it still reads onmicrosoft.com, signing hasn't switched over yet; give it up to an hour and resend.
Which DKIM errors actually break Office 365 mail?#
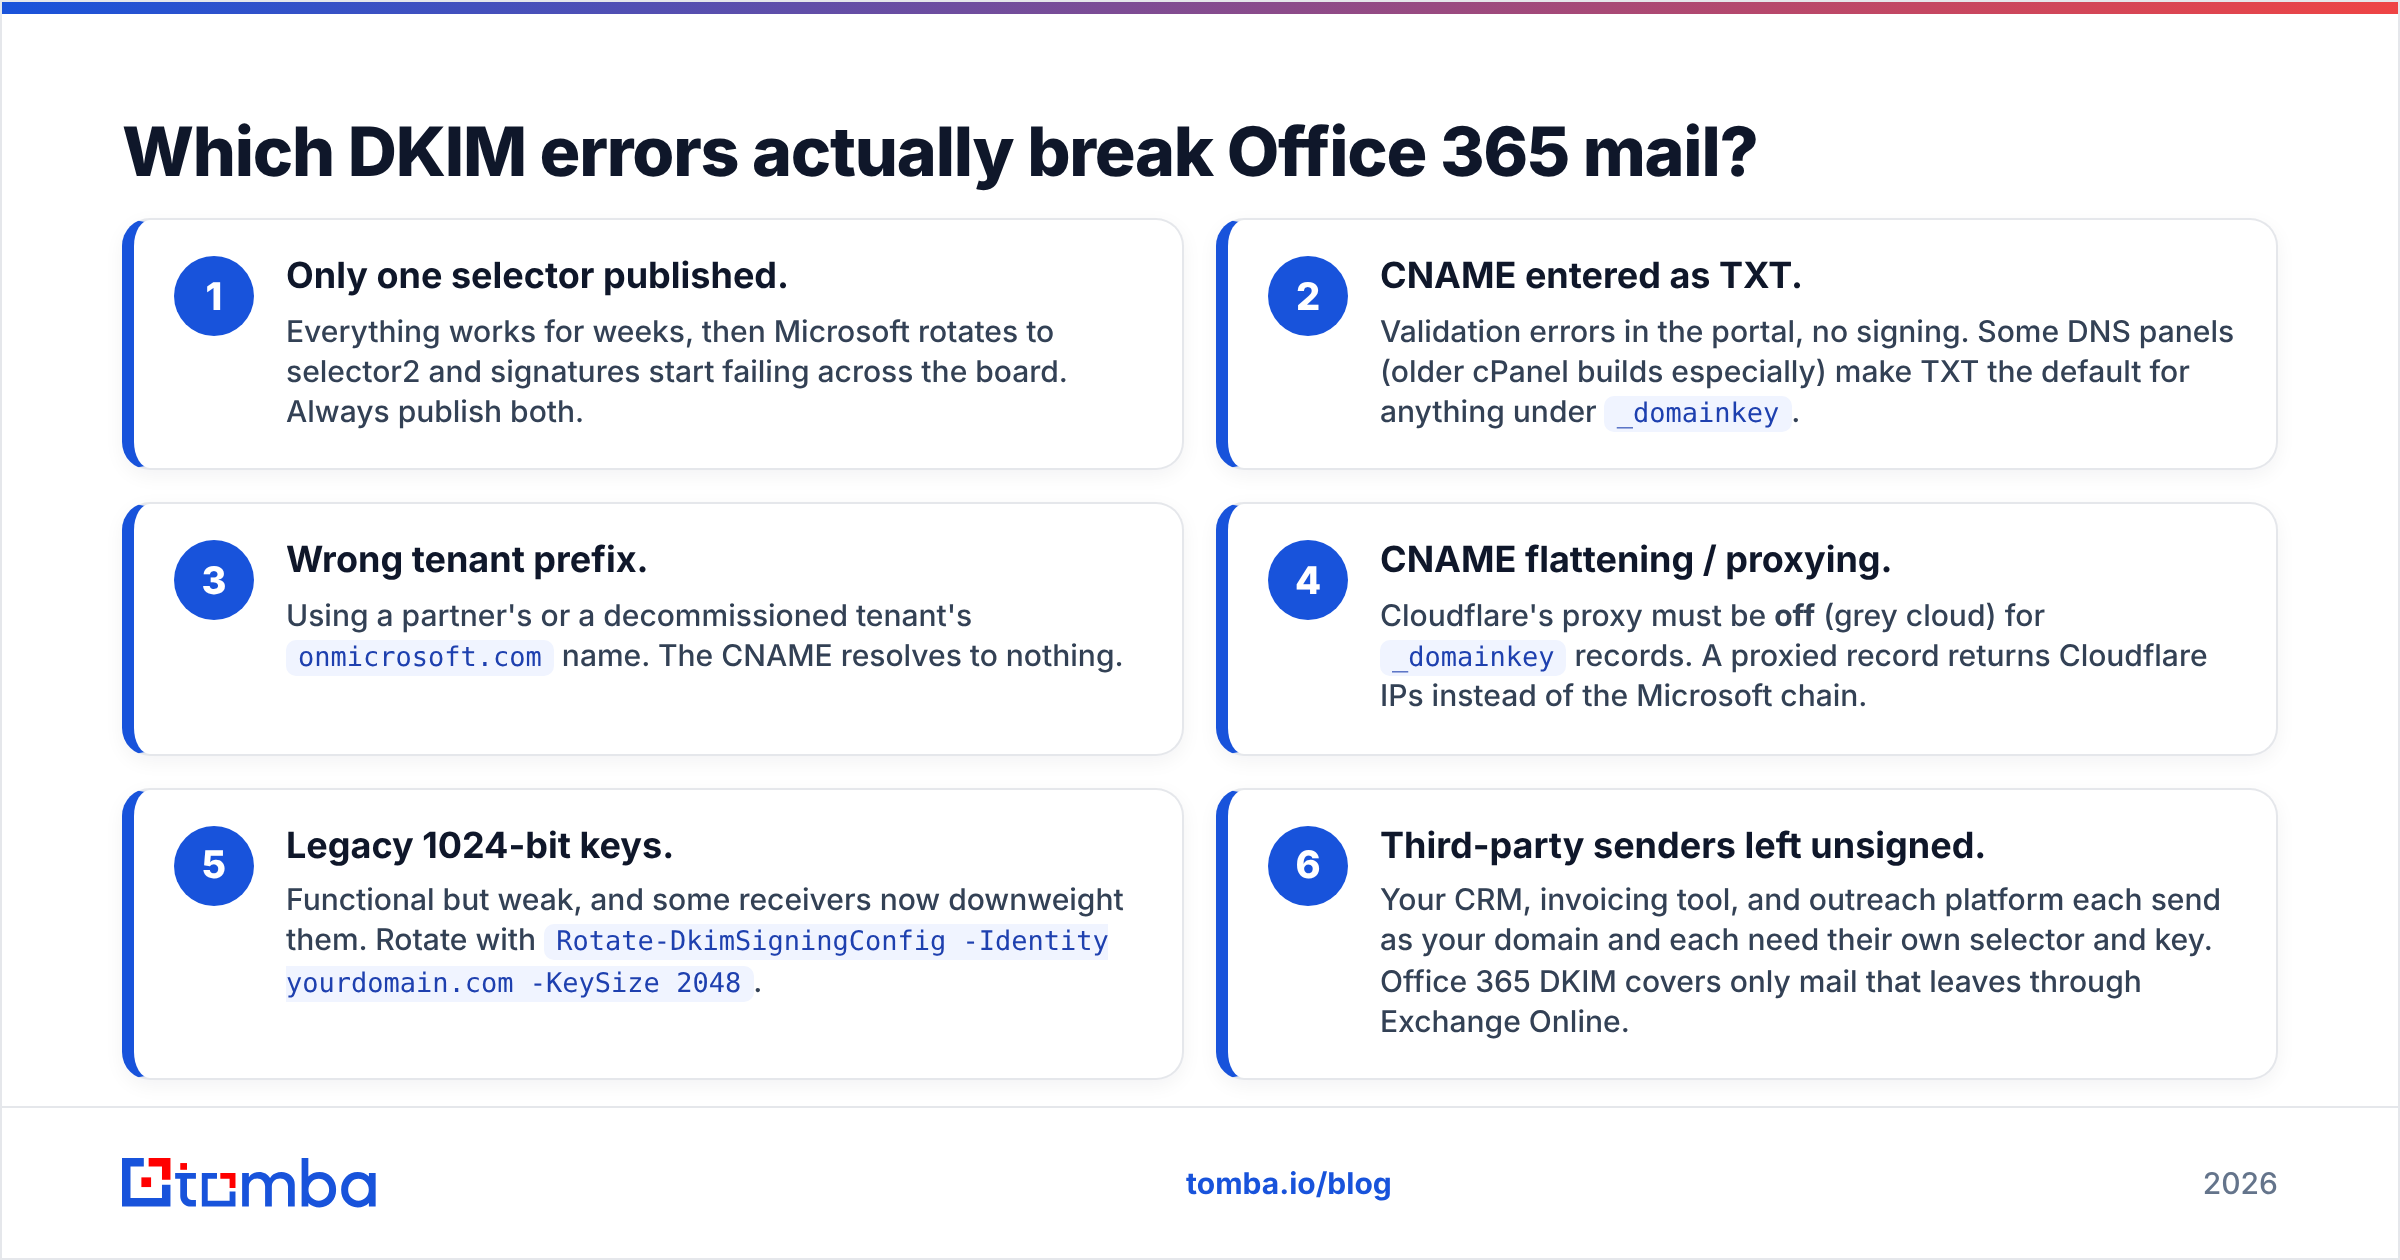
Here are the failure modes worth memorising, ranked by how often they show up in real tenants.
- Only one selector published. Everything works for weeks, then Microsoft rotates to selector2 and signatures start failing across the board. Always publish both.
- CNAME entered as TXT. Validation errors in the portal, no signing. Some DNS panels (older cPanel builds especially) make TXT the default for anything under
_domainkey. - Wrong tenant prefix. Using a partner's or a decommissioned tenant's
onmicrosoft.comname. The CNAME resolves to nothing. - CNAME flattening / proxying. Cloudflare's proxy must be off (grey cloud) for
_domainkeyrecords. A proxied record returns Cloudflare IPs instead of the Microsoft chain. - Legacy 1024-bit keys. Functional but weak, and some receivers now downweight them. Rotate with
Rotate-DkimSigningConfig -Identity yourdomain.com -KeySize 2048. - Third-party senders left unsigned. Your CRM, invoicing tool, and outreach platform each send as your domain and each need their own selector and key. Office 365 DKIM covers only mail that leaves through Exchange Online.
That last one deserves emphasis. If you send cold outreach through a sequencer connected to your Microsoft 365 mailbox via OAuth, that mail typically does route through Exchange Online and inherits your DKIM signature. But if the tool relays through its own SMTP infrastructure, it does not — you'll need to add that vendor's DKIM record separately. Check the raw headers of a test send before assuming.
How do SPF, DKIM, and DMARC fit together?#
They answer three different questions, and skipping any one leaves a gap.
- SPF answers "is this IP allowed to send for this domain?" It's an authorization list published as a TXT record. Your Office 365 record is usually
v=spf1 include:spf.protection.outlook.com -all, plus includes for every other sending service. SPF breaks when mail is forwarded, and it has a hard 10-DNS-lookup limit. - DKIM answers "was this message altered, and does the signer control this domain?" It's cryptographic and survives forwarding, as long as intermediaries don't rewrite the signed headers or body.
- DMARC answers "what should the receiver do when SPF and DKIM disagree with the From address?" It ties the other two to the visible domain via alignment and gives you reporting.
Start DMARC at v=DMARC1; p=none; rua=mailto:dmarc-reports@yourdomain.com, read aggregate reports for two to four weeks, then move to p=quarantine and eventually p=reject. Going straight to reject before you've inventoried every sending source is the fastest way to lose legitimate invoices and password resets.
You can sanity-check the authorization side with a free SPF checker before you touch DMARC policy, and confirm your sending IP hasn't landed anywhere nasty with a blacklist checker.

Does DKIM in Office 365 guarantee inbox placement?#
No — and this is where a lot of teams misallocate effort.
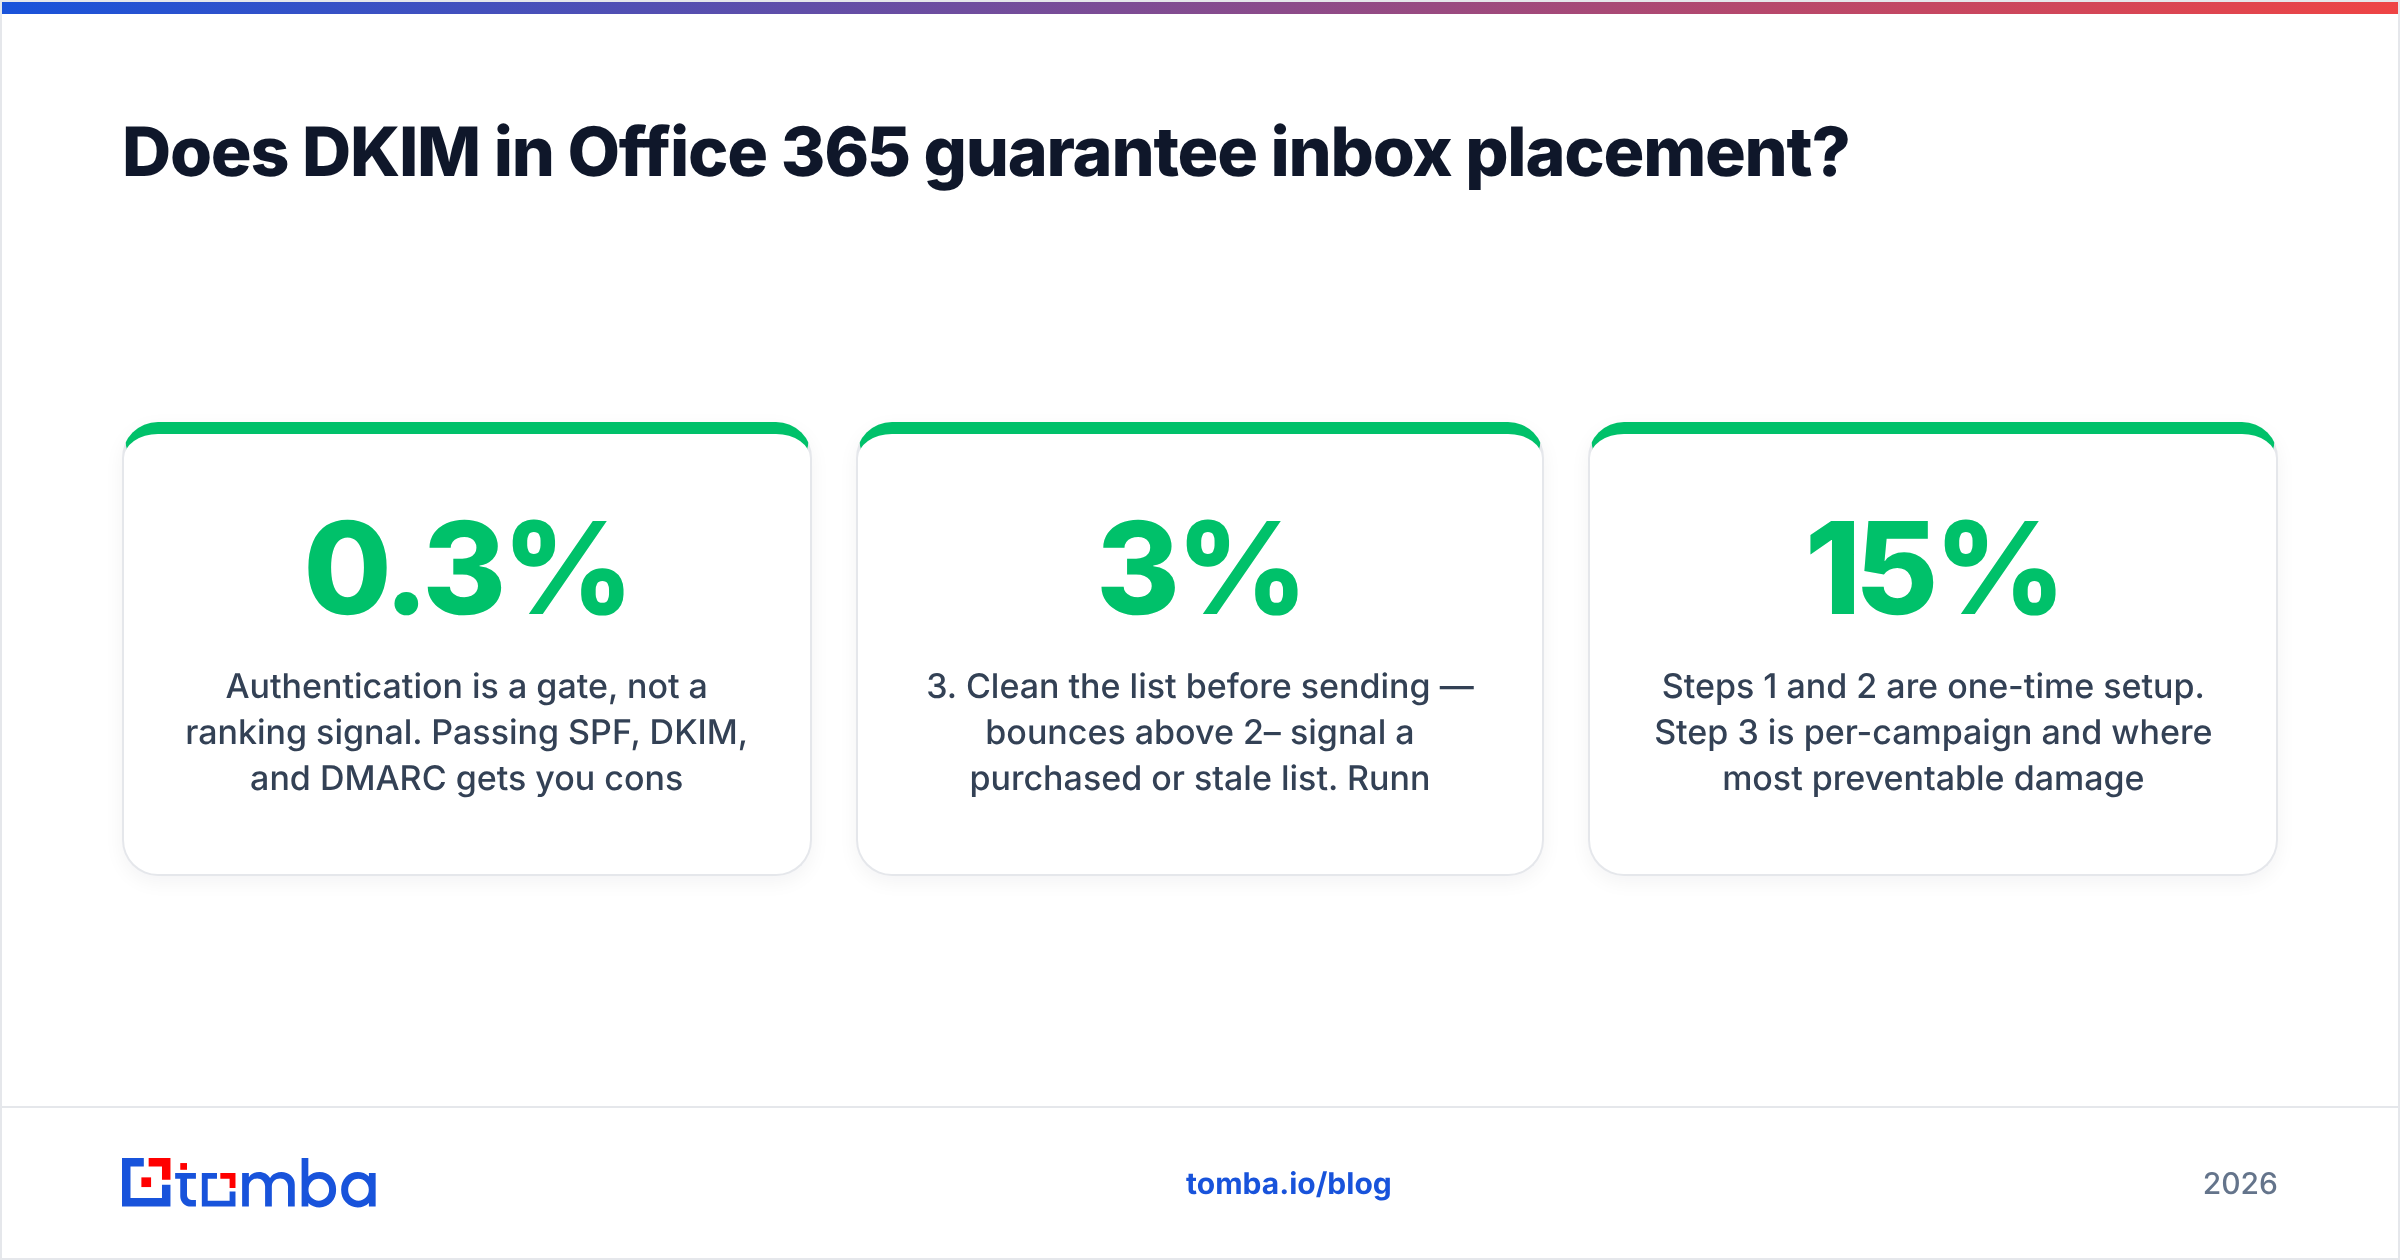
Authentication is a gate, not a ranking signal. Passing SPF, DKIM, and DMARC gets you considered. What decides inbox versus spam after that is engagement history, complaint rate, bounce rate, sending volume consistency, and content patterns. Microsoft's own filtering stack weighs recipient interaction heavily. Google's postmaster guidelines are explicit that spam complaint rates above 0.3% cause problems regardless of perfect authentication.
The practical hierarchy for outbound teams:
- Authenticate properly — SPF, aligned DKIM, DMARC. Non-negotiable baseline.
- Warm the domain and mailbox — ramp from ~20 sends/day, add volume over four to six weeks. A warmup calculator gives you a realistic ramp schedule instead of guesswork.
- Clean the list before sending — bounces above 2–3% signal a purchased or stale list. Running addresses through an email verifier before a campaign is the single highest-leverage deliverability step after authentication, because bad addresses cause hard bounces that authentication cannot rescue.
- Separate your domains — send cold outreach from a dedicated domain, not your primary corporate one. If reputation tanks, your invoicing and support mail is unaffected.
- Watch complaint signals — enroll in Microsoft SNDS and Google Postmaster Tools and actually look at the graphs weekly.
Steps 1 and 2 are one-time setup. Step 3 is per-campaign and where most preventable damage happens: a list with 15% invalid addresses will drag a perfectly authenticated domain into the spam folder within two campaigns.
How does Office 365 DKIM compare to other platforms?#
Worth knowing if you run mail across multiple systems, or if you're deciding where a new sending workload should live.
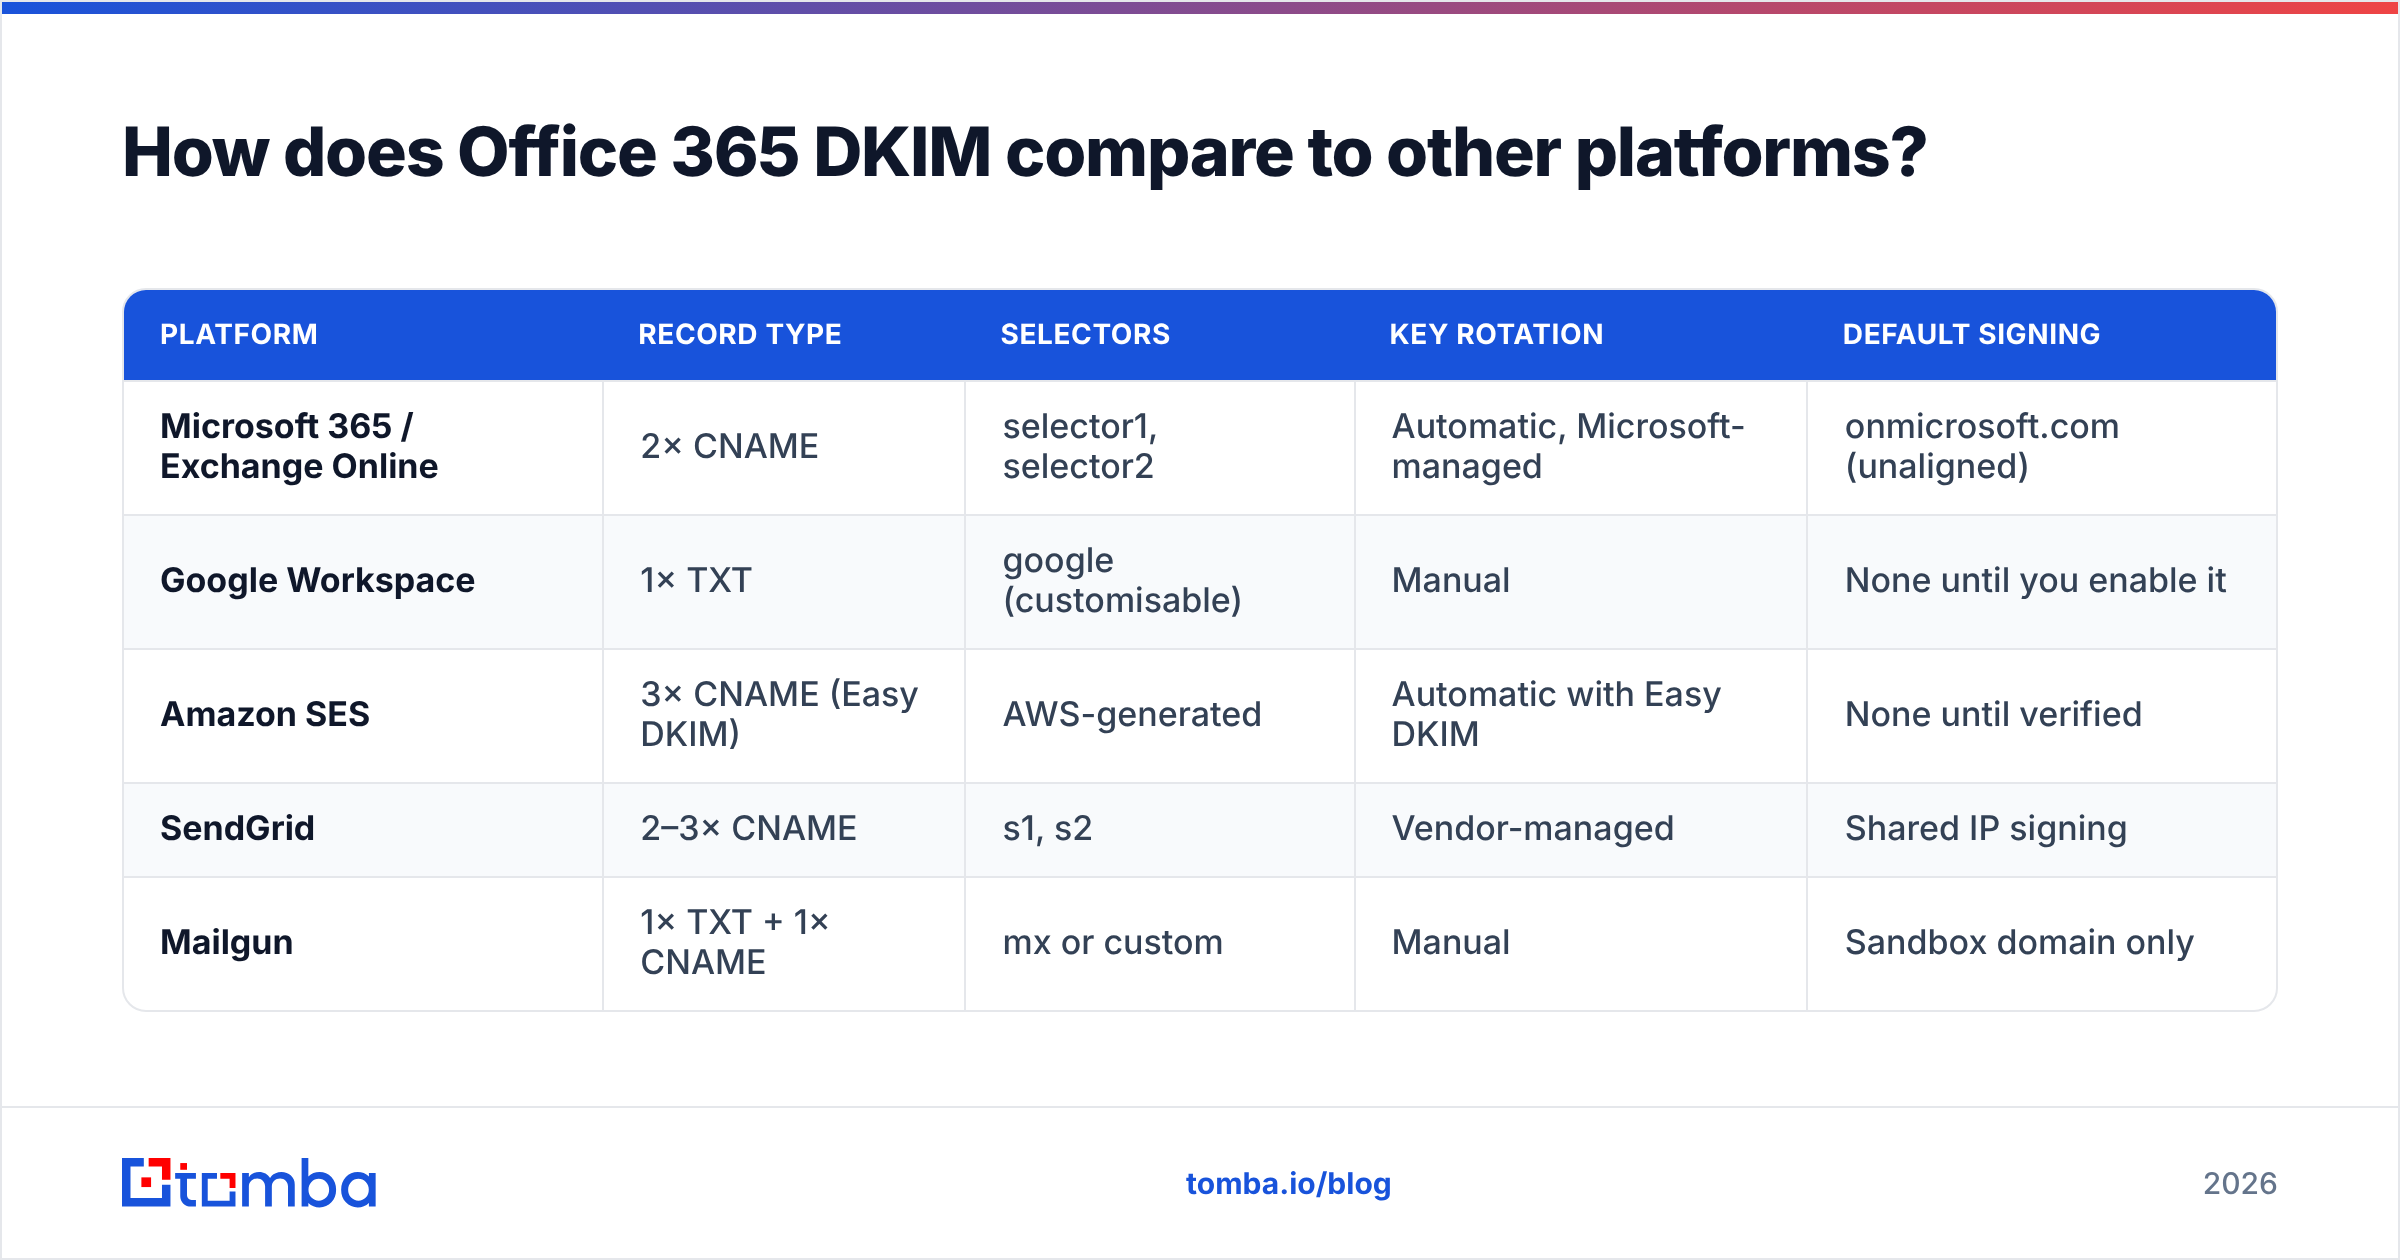
| Platform | Record type | Selectors | Key rotation | Default signing |
|---|---|---|---|---|
| Microsoft 365 / Exchange Online | 2× CNAME | selector1, selector2 | Automatic, Microsoft-managed | onmicrosoft.com (unaligned) |
| Google Workspace | 1× TXT | google (customisable) | Manual | None until you enable it |
| Amazon SES | 3× CNAME (Easy DKIM) | AWS-generated | Automatic with Easy DKIM | None until verified |
| SendGrid | 2–3× CNAME | s1, s2 | Vendor-managed | Shared IP signing |
| Mailgun | 1× TXT + 1× CNAME | mx or custom | Manual | Sandbox domain only |
Microsoft's approach is the most hands-off once configured — you never touch key material again — at the cost of a confusing setup and a default state that looks correct but isn't aligned. Google Workspace is more transparent (you see the actual key) but requires manual rotation, which most orgs never do.
What should you check before your next outbound campaign?#
Run this list before every significant send, not just at setup.
- Headers show
dkim=pass header.d=yourdomain.comon a fresh test message to an external mailbox. - Both selectors resolve via
dig— not just the one you remember publishing. - SPF is under 10 DNS lookups and includes every active sending service.
- DMARC aggregate reports show no unexpected sources signing as your domain.
- Bounce rate on your last send was under 2%. If not, your data is the problem, not your DNS.
- Every third-party sender is separately authenticated — CRM, billing, support desk, marketing automation.
Authentication is the part you can fix in an afternoon. Data quality is the part you have to keep fixing, and it's the one that quietly costs more. A campaign to 5,000 addresses where 700 don't exist generates a bounce rate that no DKIM record can offset, and Microsoft's filters will remember it for weeks.
For a deeper reference on the terminology, Tomba's glossary entries on email deliverability and sender reputation cover the underlying concepts. Microsoft's own documentation at learn.microsoft.com is the authoritative source for portal paths, which shift between releases, and dmarc.org publishes the specification and deployment guidance for the policy layer.
Where does contact data fit into all of this?#
Right at the front. Every hard bounce is a message you paid reputation for and got nothing back from. The order of operations that actually works is: authenticate the domain, warm the mailbox, verify the list, then send.
Once DKIM, SPF, and DMARC are green in Office 365, the bottleneck moves to whether the addresses you're sending to are real and current. That's where Tomba's Email Finder fits — it returns verified professional addresses with a confidence score and source attribution, so your campaigns start from data that won't bounce. It's free to try with 25 searches a month, and paid plans start at $49/mo on Tomba pricing if you need bulk volume or API access to wire verification into your sending pipeline.
Fix the DNS once. Fix the data every time.
Related guides#
Ready to find emails that actually work?
Join 150,000+ professionals who stopped guessing and started sending. Free credits on signup — no credit card required.
Get the Tomba newsletter
Practical outbound tactics and product updates — once every two weeks.
About the author