DKIM Setup on GoDaddy: The Complete 2026 Walkthrough
GoDaddy's DNS manager silently breaks DKIM records in three predictable ways. Here's the exact setup path, the TXT-length trap, and how to verify your signature actually passes.

TL;DR
- GoDaddy DKIM setup is a three-step job: generate the key in your email platform, add a CNAME or TXT record in GoDaddy DNS, then verify the signature on a live send.
- The single most common failure is GoDaddy's 255-character limit per TXT string. A 2048-bit DKIM key is longer than that and must be split into quoted chunks — or you use CNAME delegation instead and skip the problem entirely.
- GoDaddy auto-appends your domain to record names. Typing
selector1._domainkey.yourdomain.comproducesselector1._domainkey.yourdomain.com.yourdomain.comand silently fails. - DNS propagation on GoDaddy is usually 5–30 minutes, not the 48 hours the support docs quote. If it's still failing after an hour, the record is wrong, not slow.
- DKIM alone won't save a bad list. Signed mail to dead mailboxes still burns your sender reputation — verify addresses before you send.
What is DKIM and why does it matter on GoDaddy?#
DKIM (DomainKeys Identified Mail) is a tamper-proof wax seal on an envelope. Your sending server stamps every outgoing message with a cryptographic signature using a private key. The receiving server looks up the matching public key in your DNS, re-computes the seal, and confirms nobody altered the message in transit — and that the sender actually controls the domain.
Since February 2024, Google and Yahoo require SPF, DKIM, and DMARC for anyone sending more than 5,000 messages a day to their users, and they enforce it for smaller senders too when spam complaints spike. Microsoft tightened the same rules for Outlook.com in 2025. Unsigned bulk mail now lands in spam by default at the three largest consumer mailbox providers.
GoDaddy matters here because it is one of the largest domain registrars on earth, which means a huge share of small-business domains have their DNS parked there. And GoDaddy's DNS manager has quirks that break DKIM in ways the error messages never explain. That's what this guide fixes.
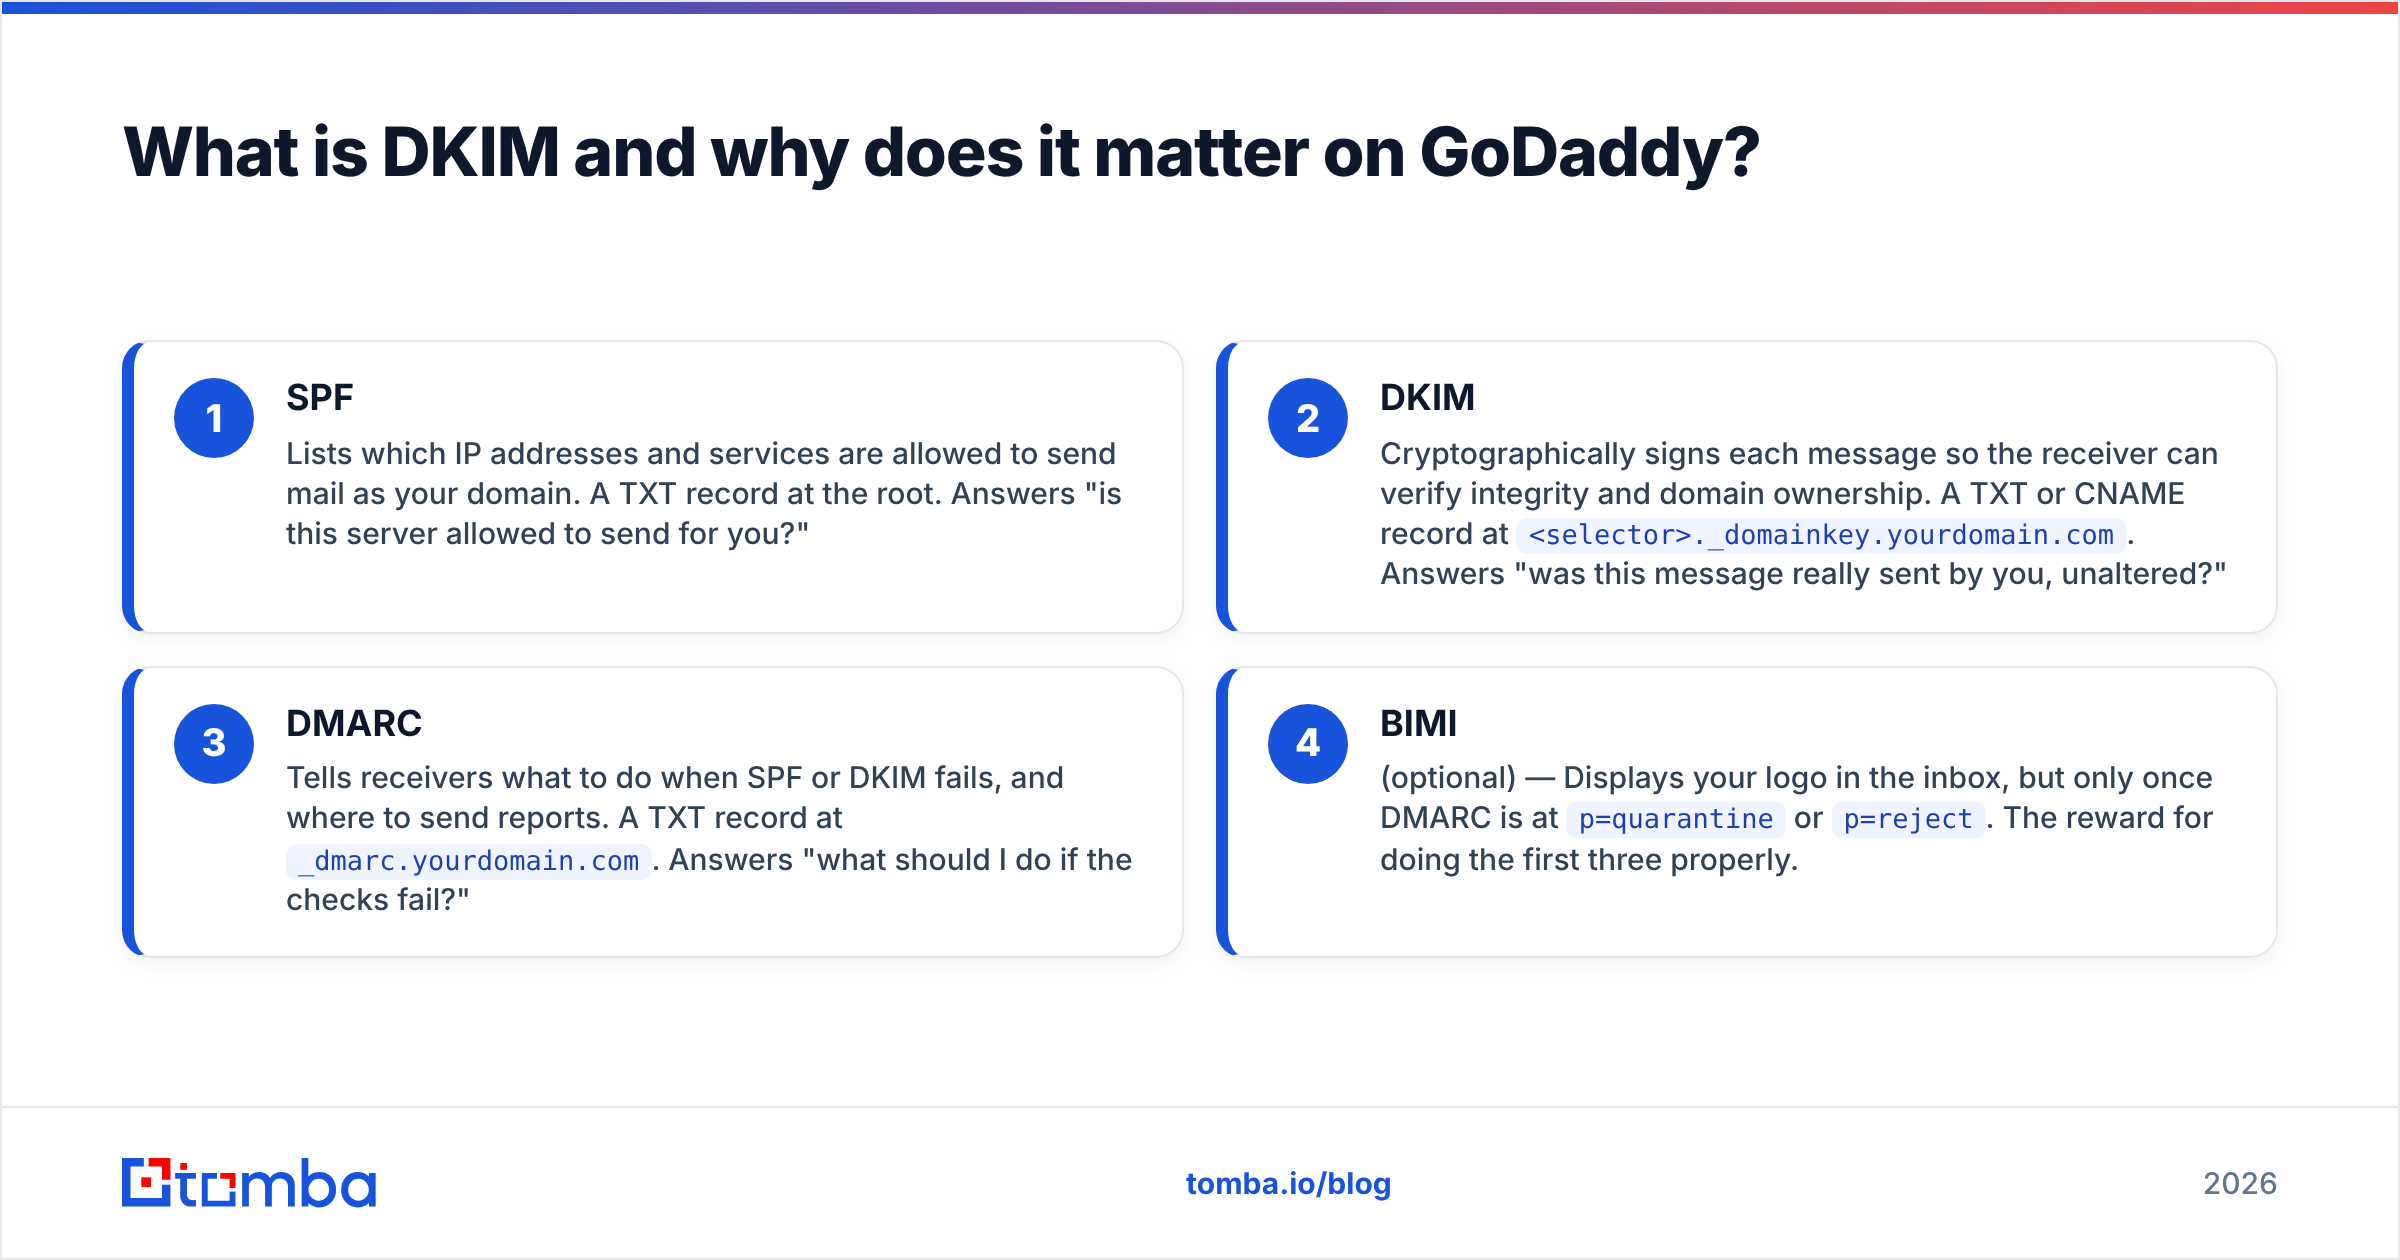
Here's what the three authentication records actually do:
- SPF — Lists which IP addresses and services are allowed to send mail as your domain. A TXT record at the root. Answers "is this server allowed to send for you?"
- DKIM — Cryptographically signs each message so the receiver can verify integrity and domain ownership. A TXT or CNAME record at
<selector>._domainkey.yourdomain.com. Answers "was this message really sent by you, unaltered?" - DMARC — Tells receivers what to do when SPF or DKIM fails, and where to send reports. A TXT record at
_dmarc.yourdomain.com. Answers "what should I do if the checks fail?" - BIMI (optional) — Displays your logo in the inbox, but only once DMARC is at
p=quarantineorp=reject. The reward for doing the first three properly.
You need all three of the first items. DKIM without SPF is half a lock. SPF without DMARC gives you no visibility into who is spoofing you.
How do you set up DKIM on GoDaddy step by step?#
The order matters. Generate first, publish second, verify third — never publish a record before your email platform has generated the key pair.
Step 1 — Generate the key in your email platform.
DKIM keys are always created by whoever sends your mail, not by GoDaddy. GoDaddy only hosts the public half.
- Google Workspace: Admin console → Apps → Google Workspace → Gmail → Authenticate email. Pick 2048-bit. Google gives you a TXT record with the selector
google. - Microsoft 365: Defender portal → Email & collaboration → Policies & rules → Threat policies → Email authentication settings → DKIM. Microsoft gives you two CNAME records with selectors
selector1andselector2. - Sending platforms (SendGrid, Mailgun, Postmark, Instantly, Smartlead): each generates its own selector under your domain, usually as CNAMEs.
Step 2 — Open GoDaddy DNS management.
Log in → My Products → find your domain → DNS → Manage Zones (or the direct path at dcc.godaddy.com/manage/dns). If your nameservers point elsewhere — Cloudflare, Route 53, your host — GoDaddy DNS is not authoritative and editing there does nothing. Check the nameserver section at the bottom of the page before you touch anything. This is the second most common wasted hour in DKIM setup.
Step 3 — Add the record.
Click "Add New Record." Then, critically:
- Type: TXT or CNAME, exactly as your provider specified. Never substitute one for the other.
- Name: enter ONLY the subdomain portion. For a full record of
google._domainkey.acme.com, typegoogle._domainkey— nothing more. GoDaddy appends.acme.comautomatically. - Value: the full key string, or the CNAME target.
- TTL: 1 hour is fine. Some people set 600 seconds during testing to iterate faster.
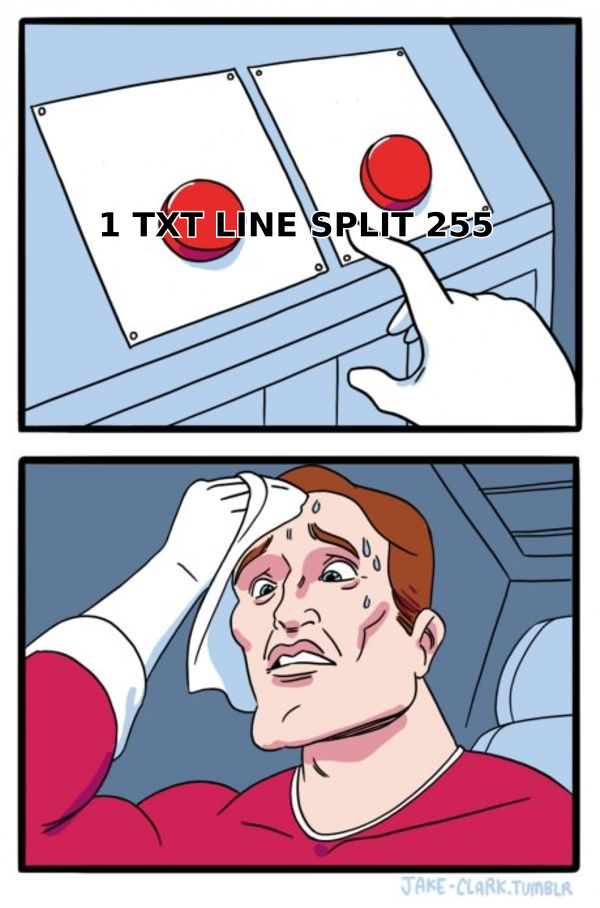
Step 4 — Handle the 255-character problem (TXT only).
A 2048-bit DKIM public key is roughly 390–420 characters. The DNS specification caps a single character-string at 255 bytes, so the value has to be split into multiple quoted strings that the resolver concatenates:
"v=DKIM1; k=rsa; p=MIIBIjANBgkqhkiG9w0BAQEFAAOCAQ8AMIIBCgKCAQEA7hLd..." "...rest of the key here==”GoDaddy's newer DNS editor accepts long values and splits them for you. The legacy editor and some API paths do not, and will either truncate the value or reject it. If your key gets cut off, either paste it as two quoted chunks with a space between them, or downgrade to a 1024-bit key as a temporary measure. Prefer splitting — 1024-bit keys are considered weak and Google flags them.
Step 5 — Turn on signing in your platform.
Google Workspace requires you to click "Start authentication" after the DNS record resolves. Microsoft requires you to toggle DKIM to "Enabled" per domain. Publishing DNS alone signs nothing.
What are the most common GoDaddy DKIM errors?#
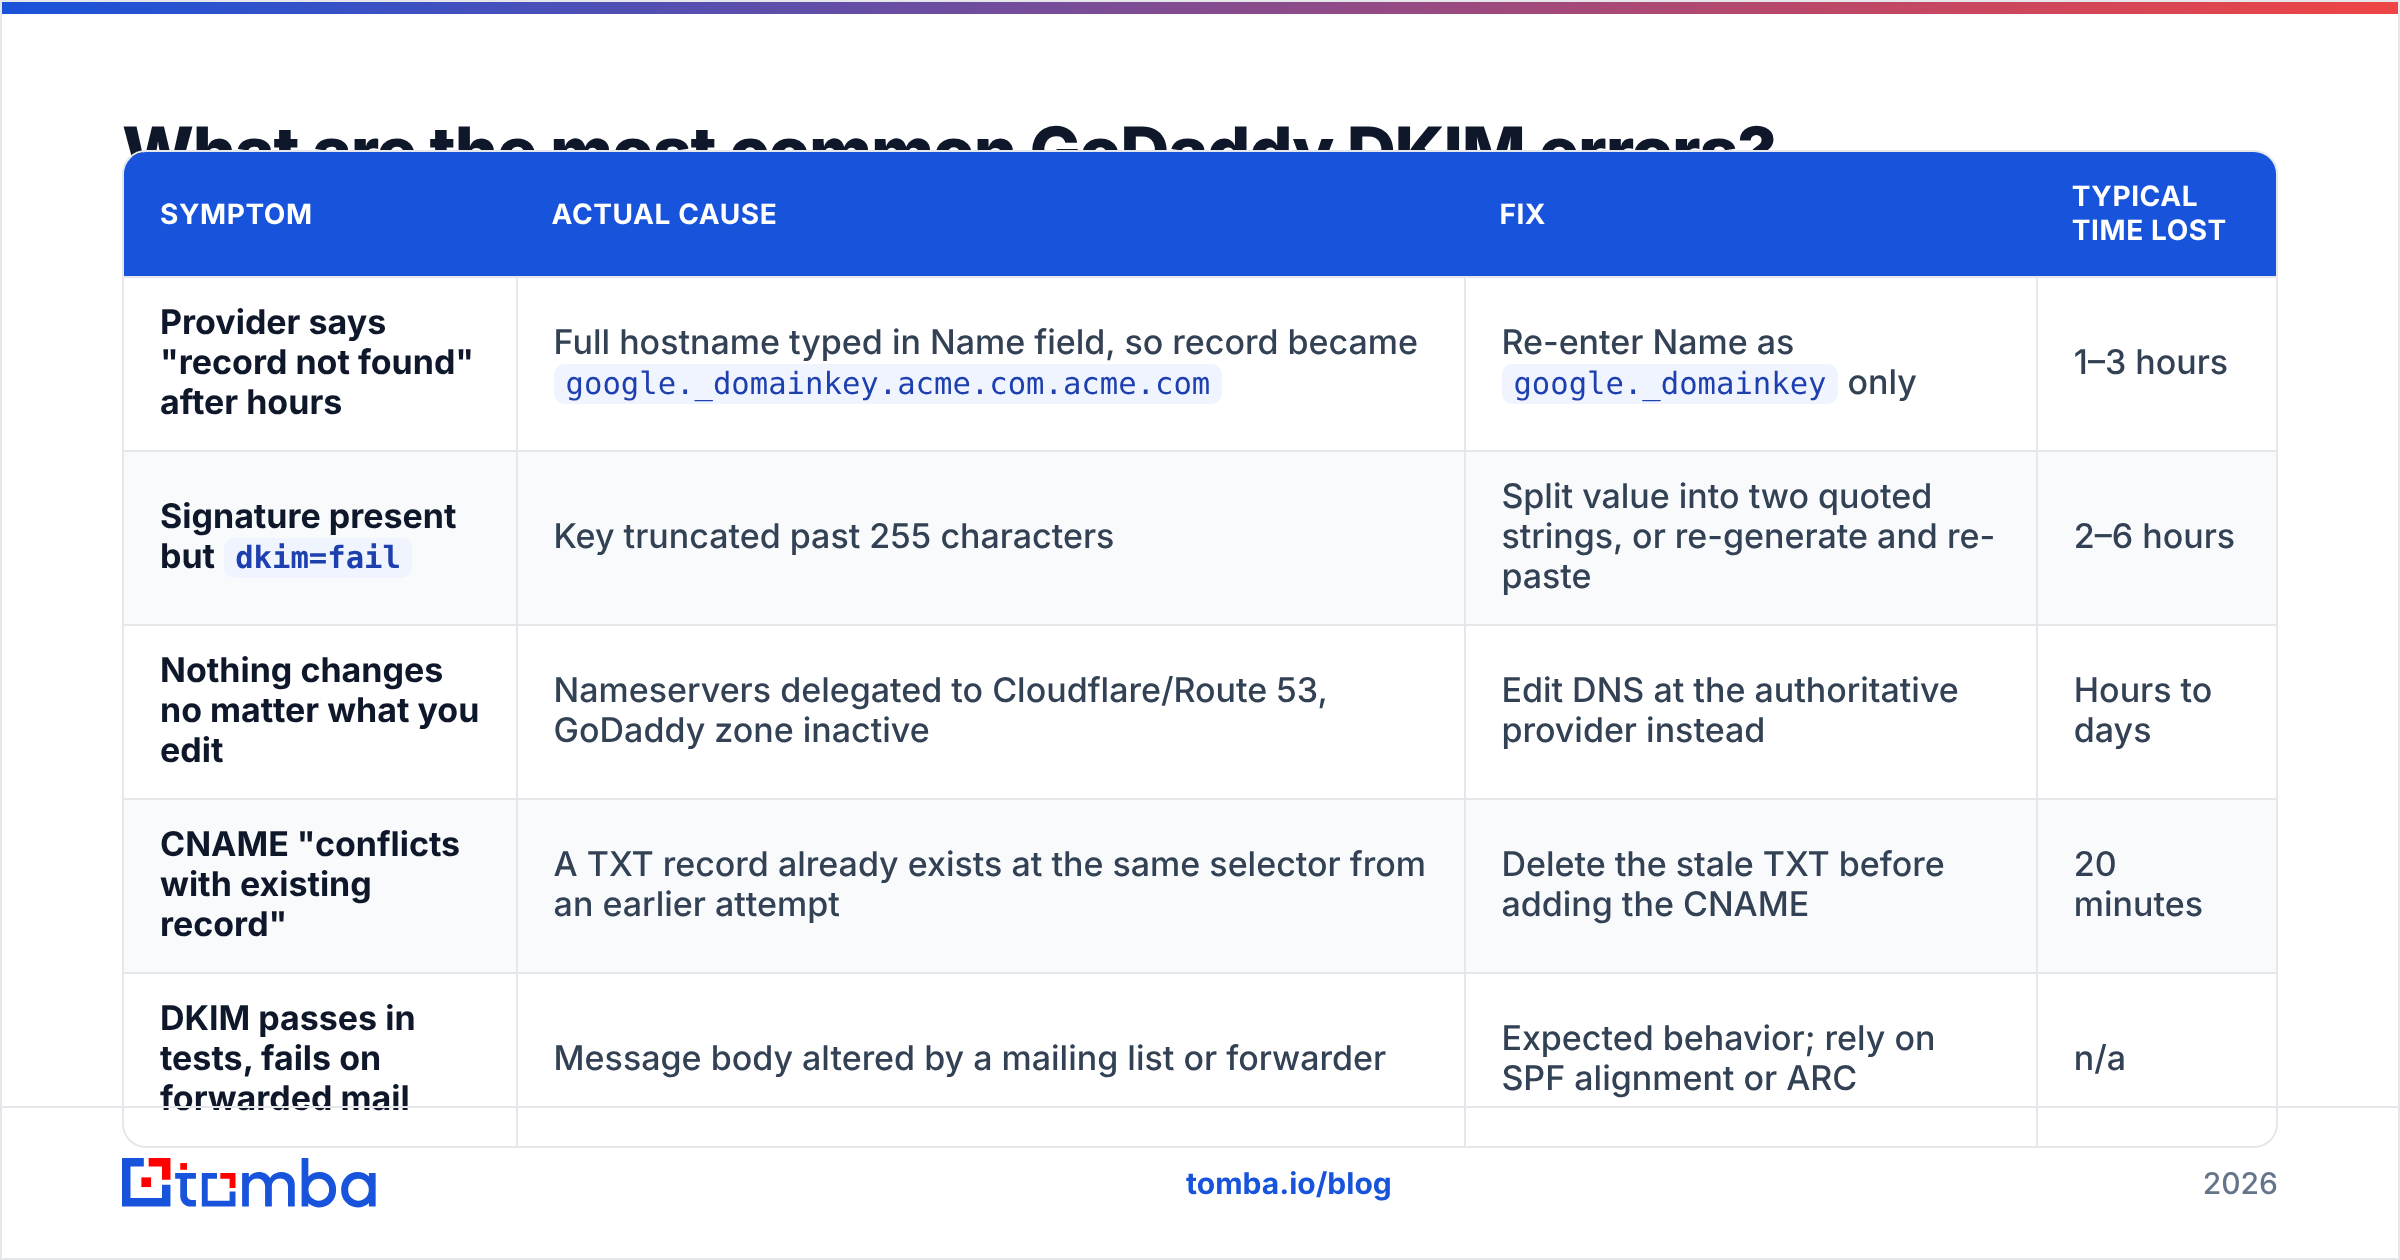
Five failure modes cover nearly every support ticket. Match your symptom to the row:
| Symptom | Actual cause | Fix | Typical time lost |
|---|---|---|---|
| Provider says "record not found" after hours | Full hostname typed in Name field, so record became google._domainkey.acme.com.acme.com |
Re-enter Name as google._domainkey only |
1–3 hours |
Signature present but dkim=fail |
Key truncated past 255 characters | Split value into two quoted strings, or re-generate and re-paste | 2–6 hours |
| Nothing changes no matter what you edit | Nameservers delegated to Cloudflare/Route 53, GoDaddy zone inactive | Edit DNS at the authoritative provider instead | Hours to days |
| CNAME "conflicts with existing record" | A TXT record already exists at the same selector from an earlier attempt | Delete the stale TXT before adding the CNAME | 20 minutes |
| DKIM passes in tests, fails on forwarded mail | Message body altered by a mailing list or forwarder | Expected behavior; rely on SPF alignment or ARC | n/a |
Two more worth knowing. First, GoDaddy's UI sometimes displays the record with your domain appended even when you entered it correctly — that display is cosmetic, but verify with an external lookup rather than trusting the panel. Second, if you previously used GoDaddy's own Microsoft 365 email bundle, GoDaddy may have pre-created selector1/selector2 CNAMEs pointing at its own tenant. Those must be removed before your own records will resolve.
How do you verify DKIM is actually working?#
Never trust the DNS panel. Verify from outside, in two layers.
Layer 1 — Does the record resolve?
Run a DNS query from your terminal:
dig TXT google._domainkey.acme.com +short
dig CNAME selector1._domainkey.acme.com +short
On Windows: nslookup -type=TXT google._domainkey.acme.com. You should see v=DKIM1; k=rsa; p=... come back as one continuous string. If you see nothing, the record isn't published or isn't authoritative. If you see two records, delete the duplicate — multiple DKIM records at one selector cause undefined behavior.
Layer 2 — Does a real message pass?
Send a message to a Gmail address you control. Open it, click the three-dot menu, choose "Show original." Look at the header block:
SPF:    PASS with IP 209.85.220.41
DKIM:   'PASS' with domain acme.com
DMARC:  'PASS'
PASS with domain acme.com is what you want. PASS with domain sendgrid.net means you're signing with your provider's domain, not yours — the record is published but signing isn't switched to your domain yet. That still fails DMARC alignment.
For a broader check, Google Postmaster Tools shows authentication pass rates across your real sending volume over time, which catches intermittent failures a single test message never will. Pair it with an SPF checker to confirm the other half of the equation, and a blacklist checker to rule out IP-level problems masquerading as auth problems.
Should you use CNAME delegation or a raw TXT record?#
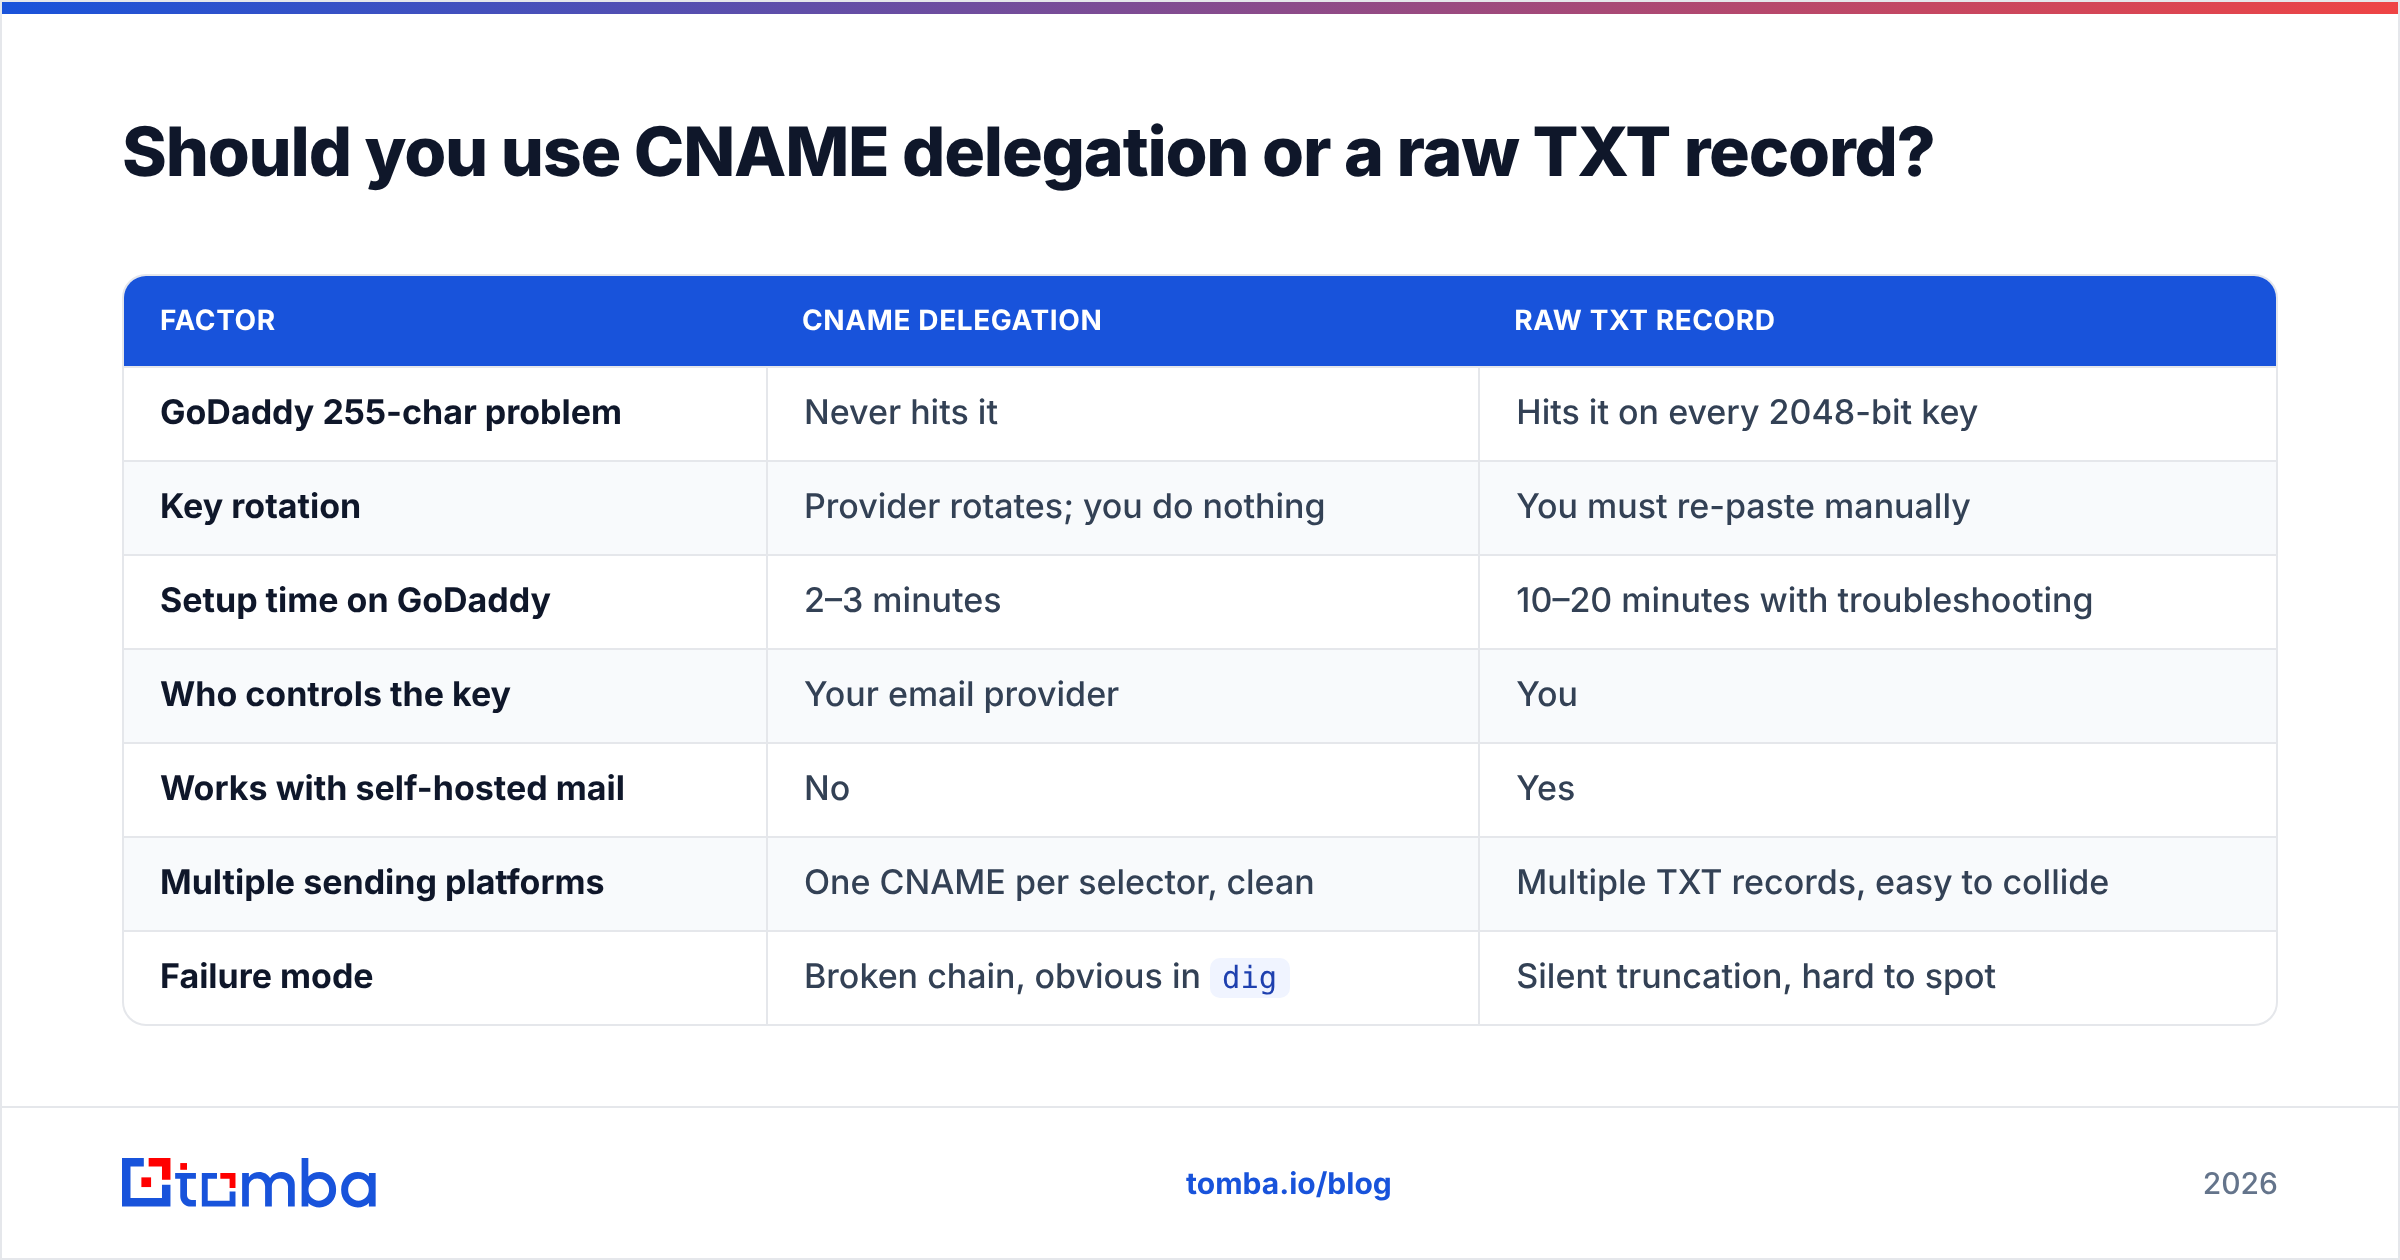
Use CNAME whenever your provider offers it. The comparison is not close for most senders:
| Factor | CNAME delegation | Raw TXT record |
|---|---|---|
| GoDaddy 255-char problem | Never hits it | Hits it on every 2048-bit key |
| Key rotation | Provider rotates; you do nothing | You must re-paste manually |
| Setup time on GoDaddy | 2–3 minutes | 10–20 minutes with troubleshooting |
| Who controls the key | Your email provider | You |
| Works with self-hosted mail | No | Yes |
| Multiple sending platforms | One CNAME per selector, clean | Multiple TXT records, easy to collide |
| Failure mode | Broken chain, obvious in dig |
Silent truncation, hard to spot |
Microsoft 365, SendGrid, Mailgun, Postmark and most modern platforms default to CNAME for exactly this reason — key rotation becomes their job, not a calendar reminder you'll ignore. Google Workspace is the notable holdout and still hands you a raw TXT.
The one real argument for TXT: if you run your own mail server or need the private key under your own control for compliance reasons, you have no choice. Everyone else should take the CNAME.

Does DKIM on GoDaddy fix your deliverability?#
No — and this is where most people stop too early.
DKIM is a permission slip, not a recommendation. It proves you are who you say you are. It says nothing about whether recipients want your mail. Mailbox providers weight engagement, complaint rate, and bounce rate far more heavily than authentication once authentication is in place. Passing DKIM gets you to the starting line.
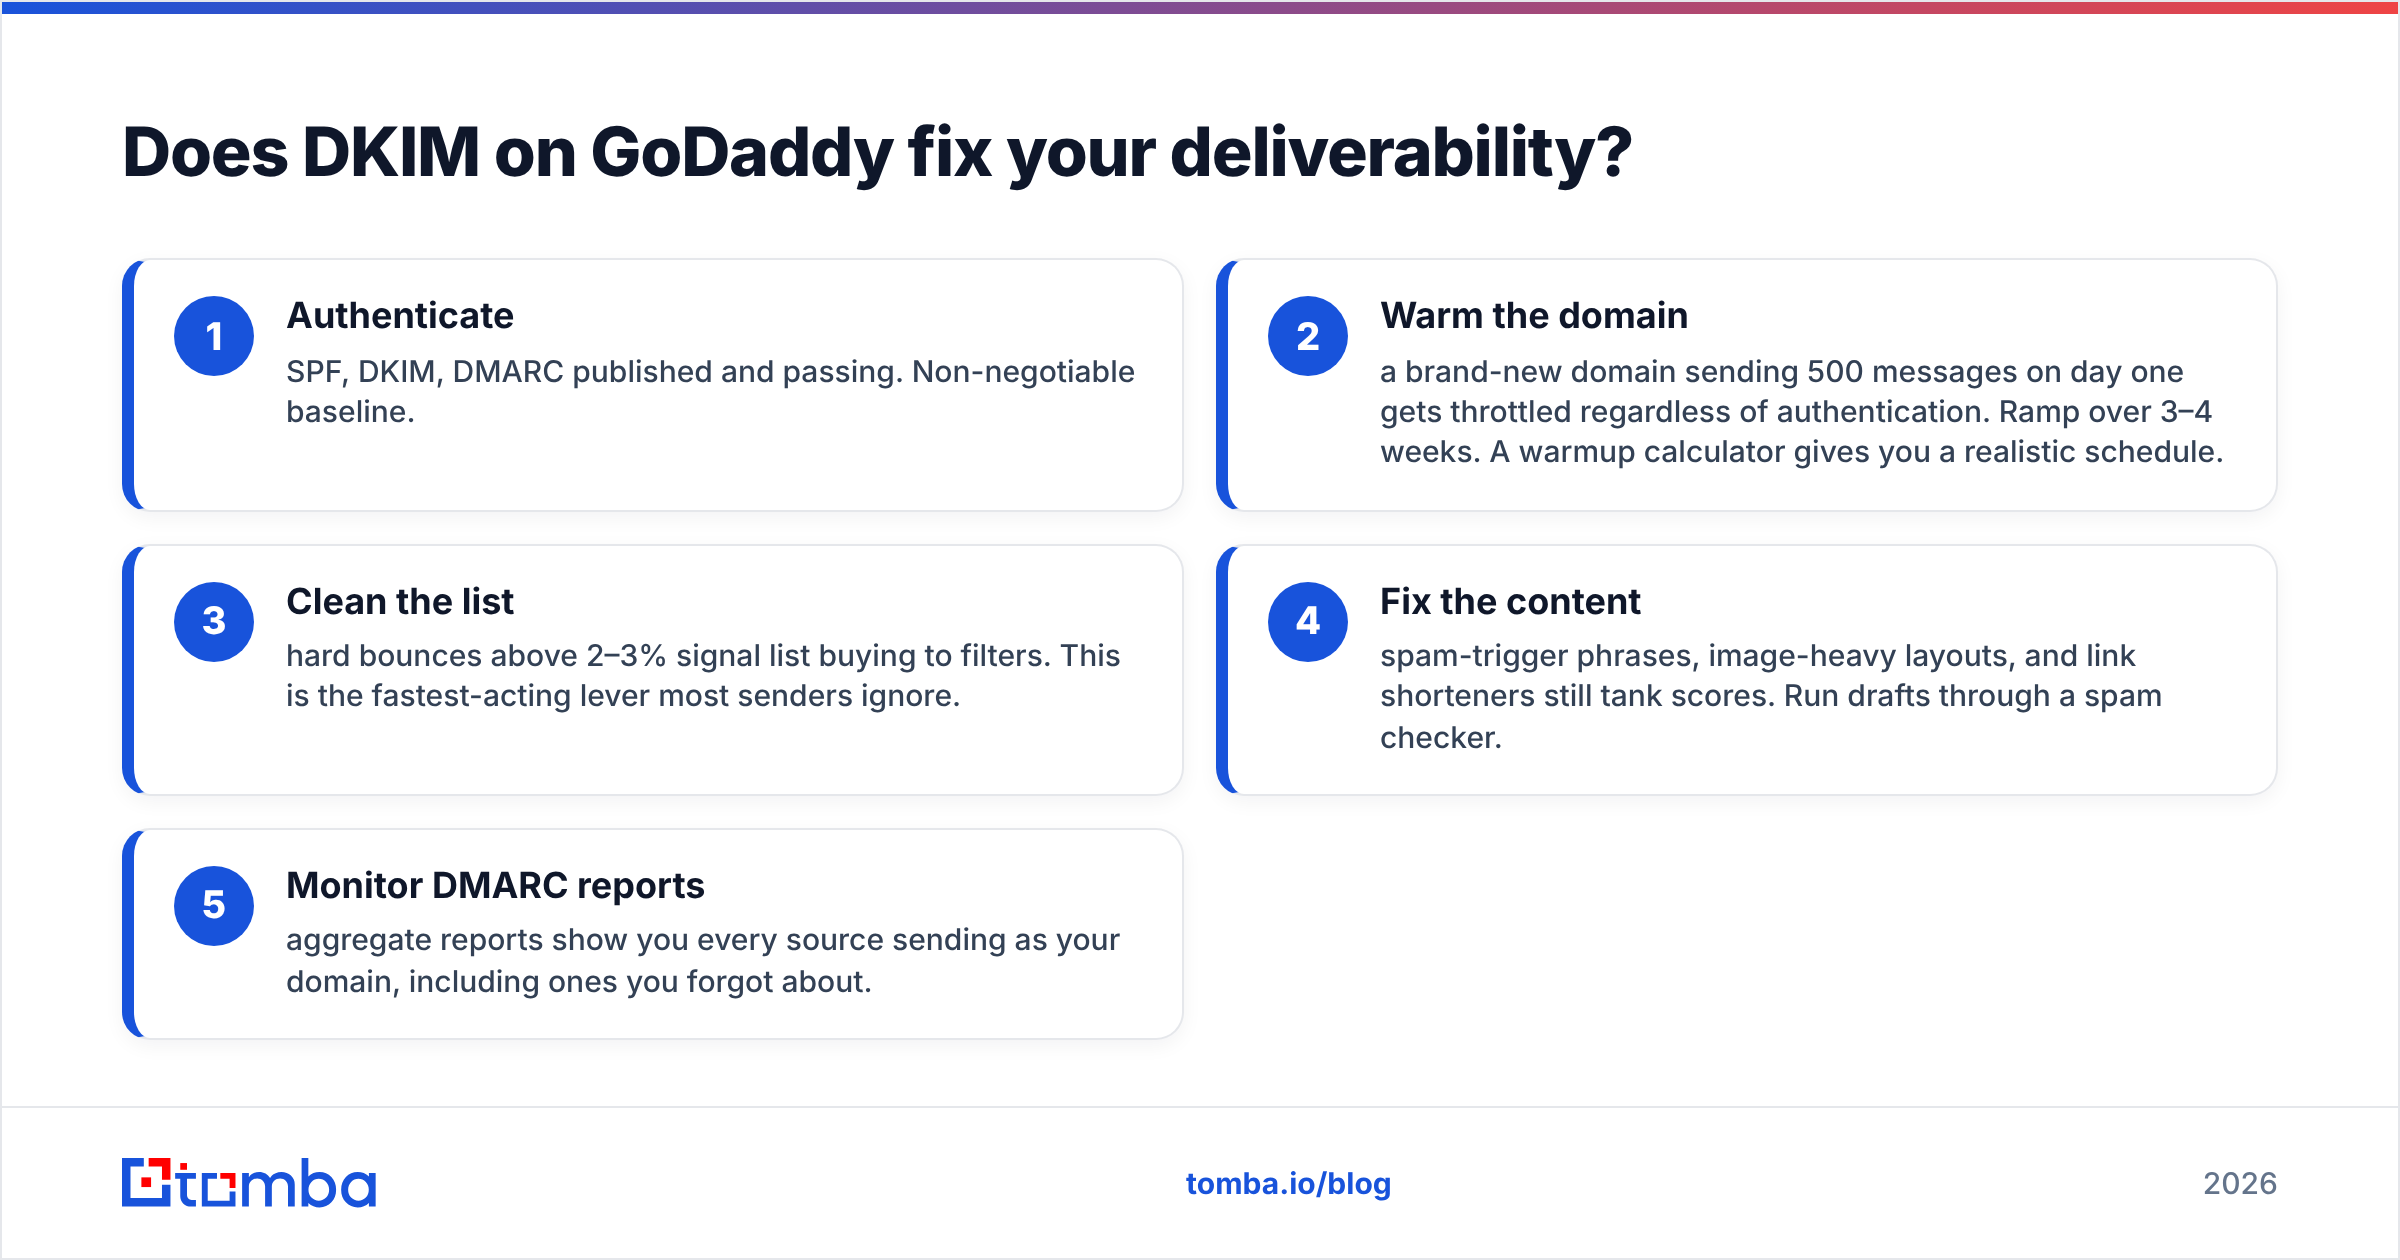
Here's the order that actually moves inbox placement:
- Authenticate — SPF, DKIM, DMARC published and passing. Non-negotiable baseline.
- Warm the domain — a brand-new domain sending 500 messages on day one gets throttled regardless of authentication. Ramp over 3–4 weeks. A warmup calculator gives you a realistic schedule.
- Clean the list — hard bounces above 2–3% signal list buying to filters. This is the fastest-acting lever most senders ignore.
- Fix the content — spam-trigger phrases, image-heavy layouts, and link shorteners still tank scores. Run drafts through a spam checker.
- Monitor DMARC reports — aggregate reports show you every source sending as your domain, including ones you forgot about.
Step 3 is where authentication work quietly gets undone. You can have a flawless DKIM setup and still torch your sender reputation by mailing a list where 15% of addresses no longer exist. Every hard bounce is a vote against you, and a perfectly signed message to a dead mailbox bounces exactly the same as an unsigned one. Verifying addresses before send — via an email verifier or bulk verify pass on imported lists — protects the authentication work you just did. For catch-all domains, where standard SMTP checks return "accept everything," a dedicated catch-all verifier is the only way to get a real answer.
The full picture on email deliverability is a stack: authentication at the bottom, list hygiene in the middle, content and engagement on top. Skip a layer and the ones above it stop working.
How long does GoDaddy DKIM propagation really take?#
Usually 5–30 minutes. GoDaddy's own documentation says "up to 48 hours," which is a legacy caution copied across the industry, not a real-world number for a fresh record with no prior cached negative response.
What actually determines the wait:
- New record, never queried before: near-instant once GoDaddy's authoritative servers update, typically under 15 minutes.
- Edited existing record: you wait out the old TTL. If TTL was 1 hour, resolvers that already cached it hold the stale value for up to an hour.
- Negative caching: if a provider queried the record before it existed, the NXDOMAIN response may be cached for 15–60 minutes. This is why "I added it and it still says not found" is so common — and why re-adding the record does nothing.
Practical rule: if dig from your own machine returns the correct value but your provider still reports "not found," wait 30 minutes and re-check in the provider's console. If dig returns nothing after 30 minutes, the record itself is wrong. Stop waiting and start re-reading the Name field.
For reference on the underlying mechanics, the DKIM specification overview covers selector syntax and key formats, and HubSpot's email authentication documentation is a decent second reference if you're cross-checking a platform-specific step.
What should you do after DKIM is passing?#
Three things, in order.
Publish DMARC at p=none immediately. Add a TXT record at _dmarc with a value like v=DMARC1; p=none; rua=mailto:dmarc@yourdomain.com. This changes nothing about how your mail is treated but starts the reports flowing. Read them for two to four weeks, confirm every legitimate source passes, then move to p=quarantine and eventually p=reject.
Set a key rotation reminder. If you're on raw TXT records, rotate the key every 6–12 months. On CNAME delegation, your provider handles it. Most people never rotate at all, which is a slow-burning risk rather than an urgent one — but it's free to schedule.
Audit every sending source. Marketing platform, CRM, transactional service, invoicing tool, help desk — each one either signs with your domain or it doesn't. DMARC aggregate reports will surface the ones you forgot. Every unsigned source is a hole in the policy you're about to enforce.
The bottom line#
DKIM setup on GoDaddy is fifteen minutes of work wrapped in three traps: the auto-appended domain in the Name field, the 255-character TXT limit, and nameservers that aren't actually pointed at GoDaddy. Check those three and the rest is copy-paste.
Then remember what authentication is for. It gets your mail eligible for the inbox — it doesn't fill your pipeline. If you're setting up DKIM because you're about to start outbound, the next bottleneck is data quality: correct addresses, at real companies, for people still in the role. That's where the Tomba Email Finder fits — find verified professional addresses by domain or name, confirm they're deliverable before they ever hit your sequence, and keep the bounce rate that would undo your DKIM work down where it belongs. Free tier covers 25 searches a month, and Tomba pricing starts at $49/mo on Starter if you need volume.
Authenticate first. Then send to addresses that exist.
Related guides#
Ready to find emails that actually work?
Join 150,000+ professionals who stopped guessing and started sending. Free credits on signup — no credit card required.
Get the Tomba newsletter
Practical outbound tactics and product updates — once every two weeks.
About the author